
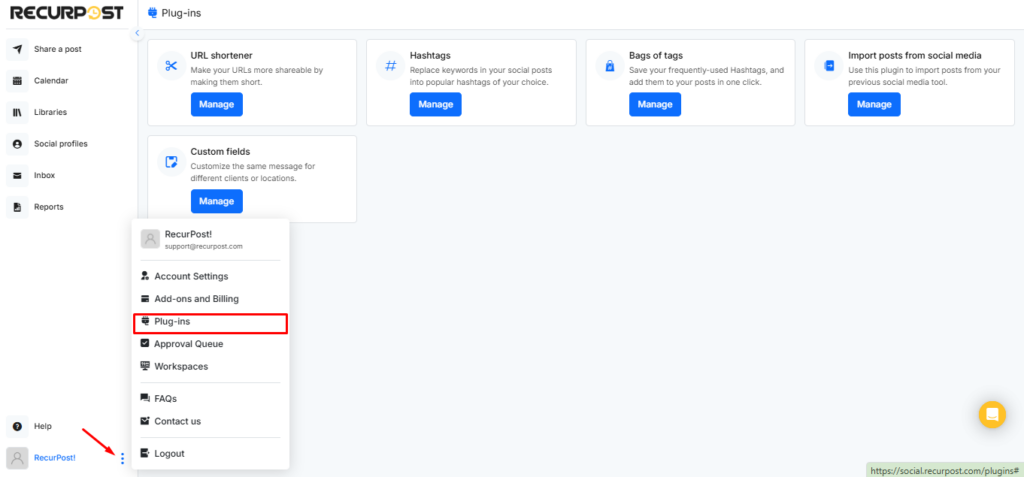
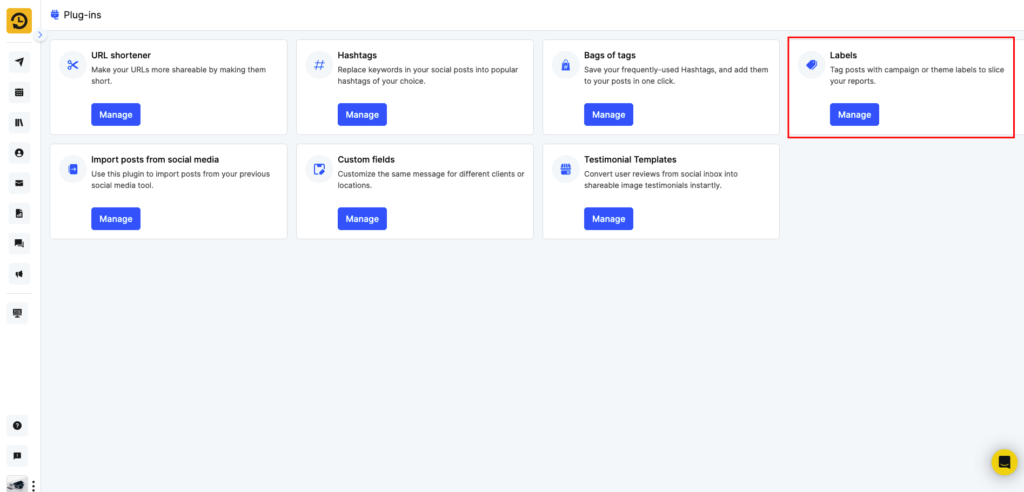
From the Plug-ins tab, you will be able to manage the following:
- URL Shortener
- Hashtags
- Bags of Tags
- Import Posts from Social Media
- Custom Fields
- Testimonial Templates
- Labels
1. How to Use the URL Shortener Plug-in?
This URL shortener shortens your URLs, making them more shareable and ensuring that you get the right message out to your audience without taking up too much room in your social posts.
For One-off Post
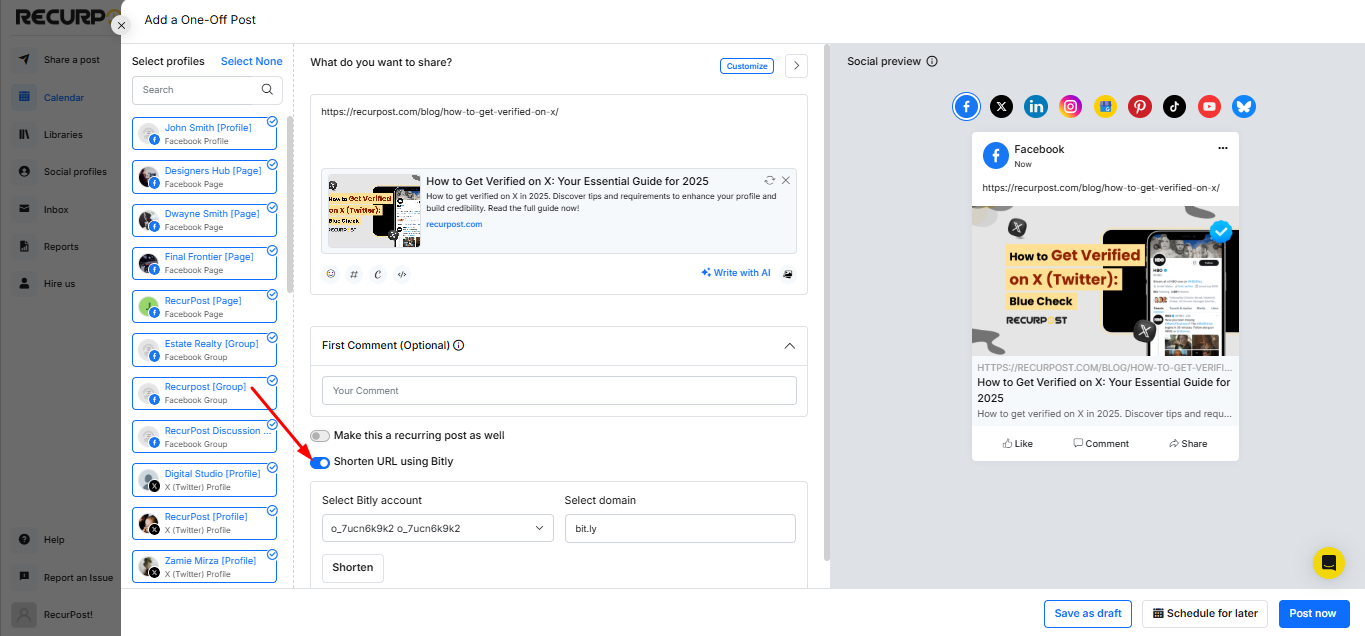
In RecurPost, you can shorten your URLs using Bitly. If you want to shorten the URLs only for specific posts, you can do that while adding the posts or while sharing the one-off post. (Please note that to use Bitly, you will have to link your Bitly account with RecurPost first)
For Recurring Posts
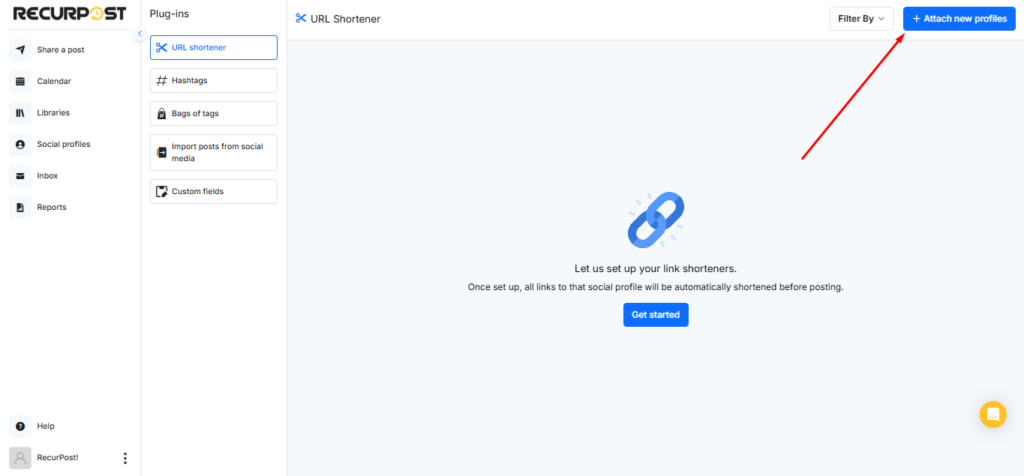
If you want RecurPost to shorten your URLs automatically while sharing the post, then you can do that by going to the URL Shortener Plug-in page. Then, click + Attach new profiles and choose Bitly (make sure to link your Bitly account if you select Bitly).

Once you’ve chosen your URL shortener and selected the social profiles you want to apply it to, the setup is complete! This ensures that all URLs shared through these profiles will be automatically shortened.
Note: Please note that the URL Shortening plug-in only applies to recurring schedules that you set up using the library. For one-off posts, URL Shortening is to be done manually at the time of creating the post.
2. How to Use the Hashtags Plug-in?
You can replace the keywords in your social posts with popular hashtags of your choice. Use a hashtag whenever possible. Simply enter your hashtags for your libraries once and we will notify you when a hashtag is available. You will be able to use it with a single click.
You can add the hashtags for each library. To do so, you need to go to plug-ins and click on the Manage option under the ‘Hashtags’ page. After that, you can select the library and add the value for the Keyword to replace and the value in the Hashtags.
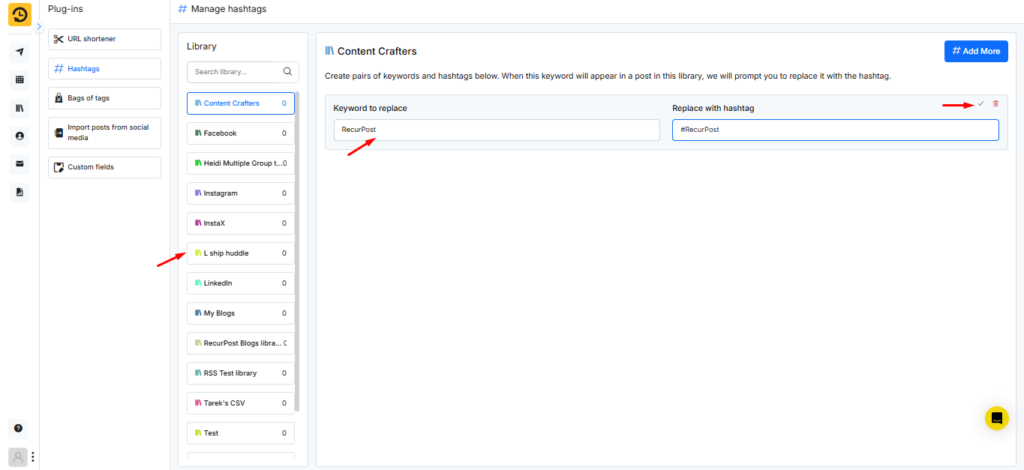
Once you have added the value and saved the hashtag, when you go to add the post in this library and use the keyword, it will prompt you with the hashtag value that you have added for that keyword. Once you click on Replace, the value will be replaced with the keyword.
Check this video for more details on the hashtag feature.
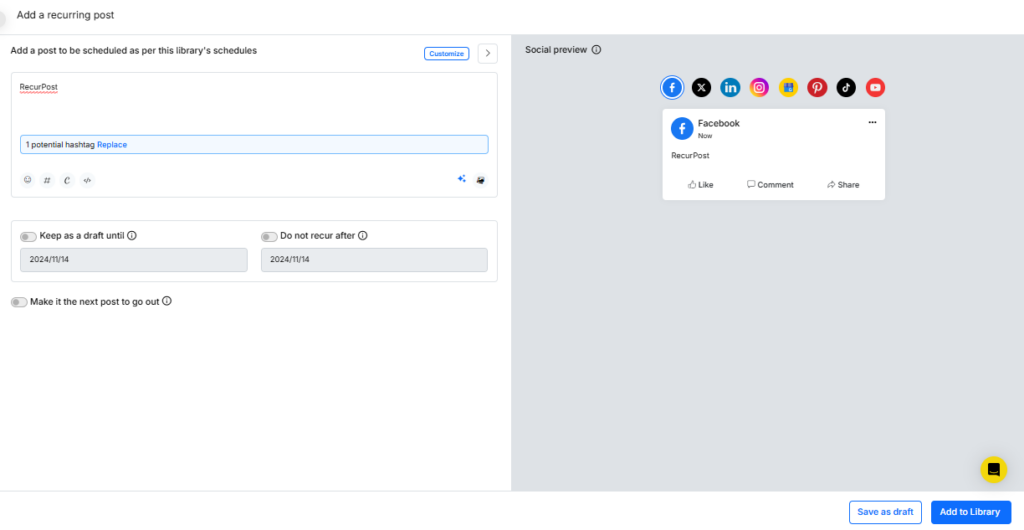
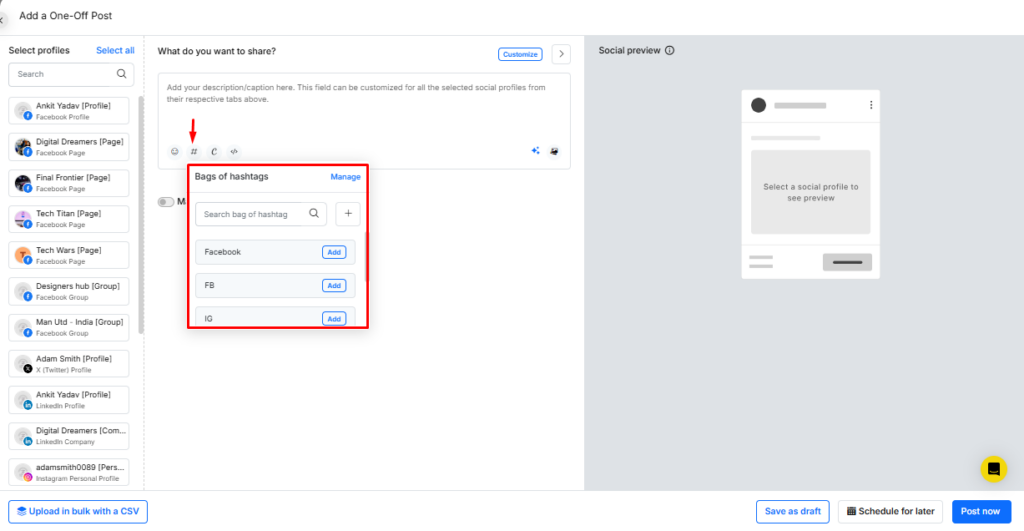
3. How to Use the Bags of Tags Plug-in?
“Bags of Tags” is a hashtag collection that is particularly significant in today’s social media scene due to the enormous deluge of digital information. RecurPost allows you to construct hashtag bags that you may use for each post you make.
To create a bag of tags, you need to go to plug-ins and click on the ‘Manage’ option under Bags of Tags. After that, you can click on “+ Add a new bag” and add the hashtags that you want to add to your post.
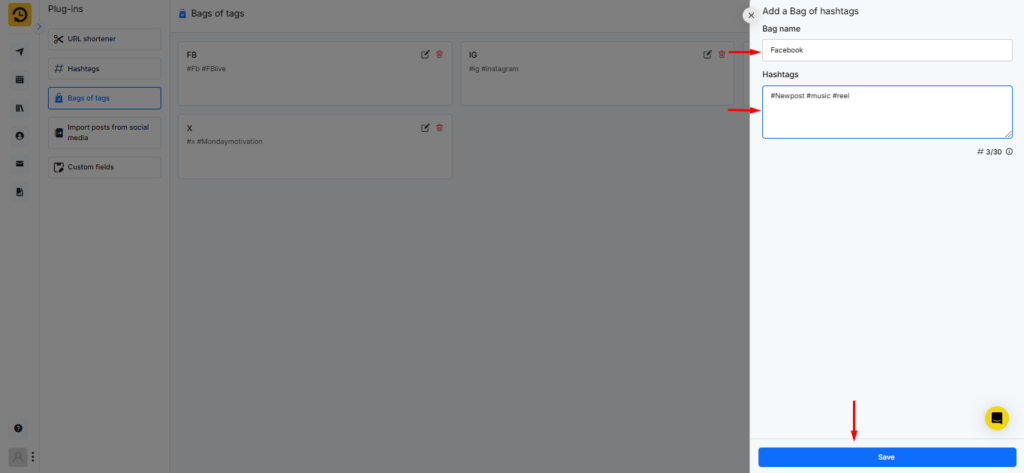
Once you have saved this bag, you can add this bag of tags while sharing a one-off post or while adding the post to your library.
Read more…To learn how to use Bag of Tags.
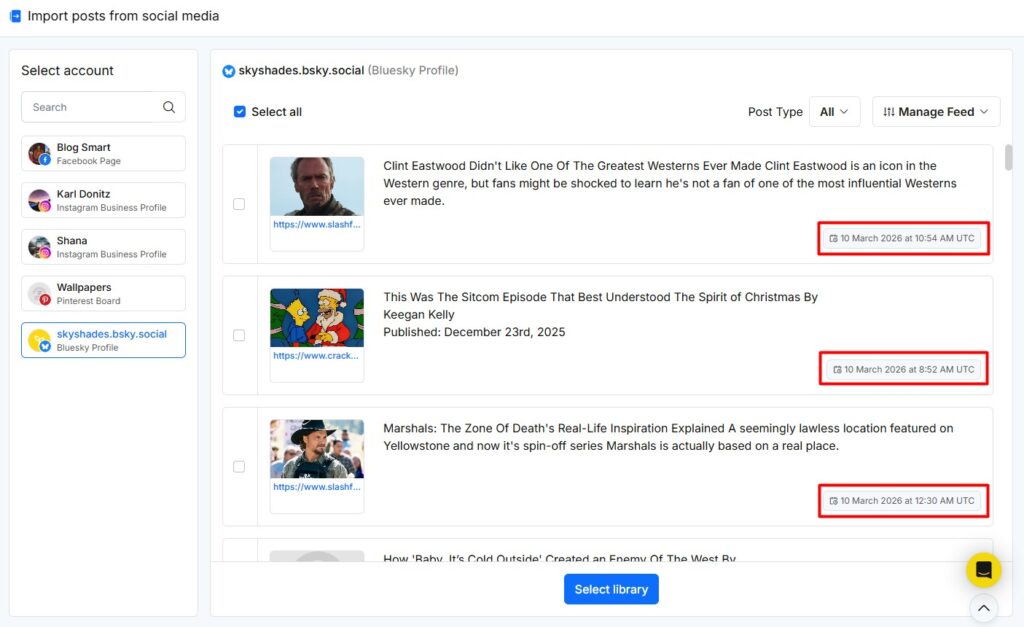
4. How to Use Import posts from Social Media Plug-in?
If you want to import content that was already published on your social profiles, you can do that with RecurPost. This feature lets you bring posts from connected social profiles into your RecurPost libraries.
To use this feature, go to Plug-ins and click Manage under Import posts from Social Media. Select the social profile from the left panel, then choose the posts you want to import.
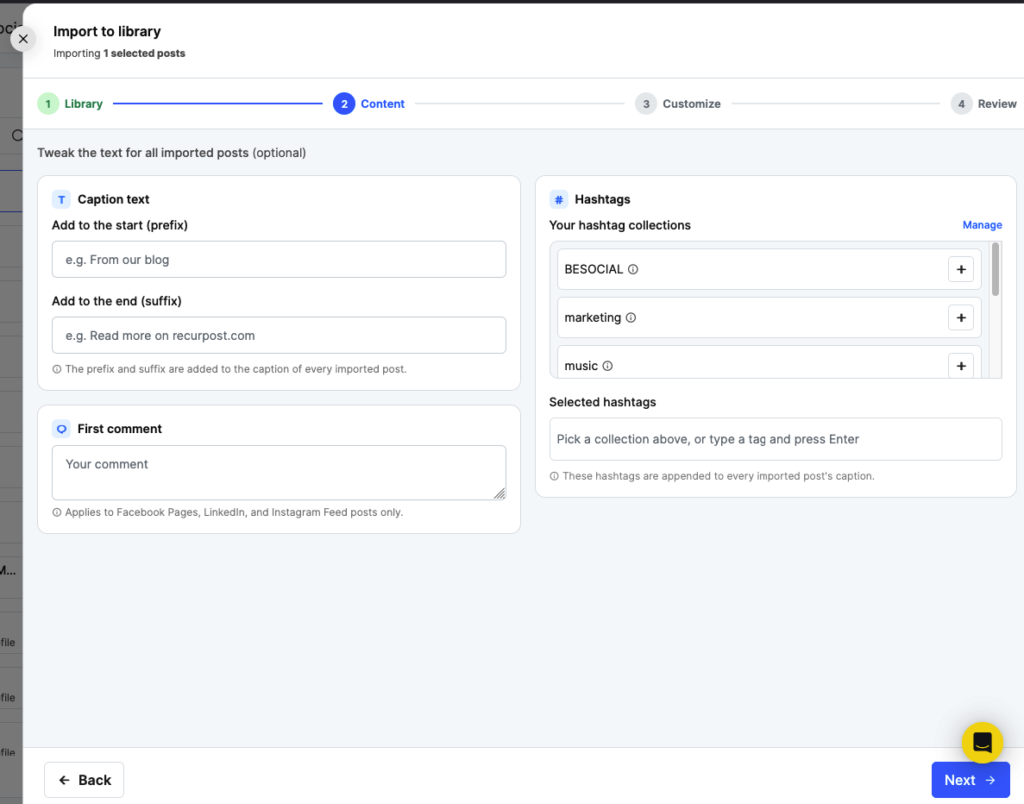
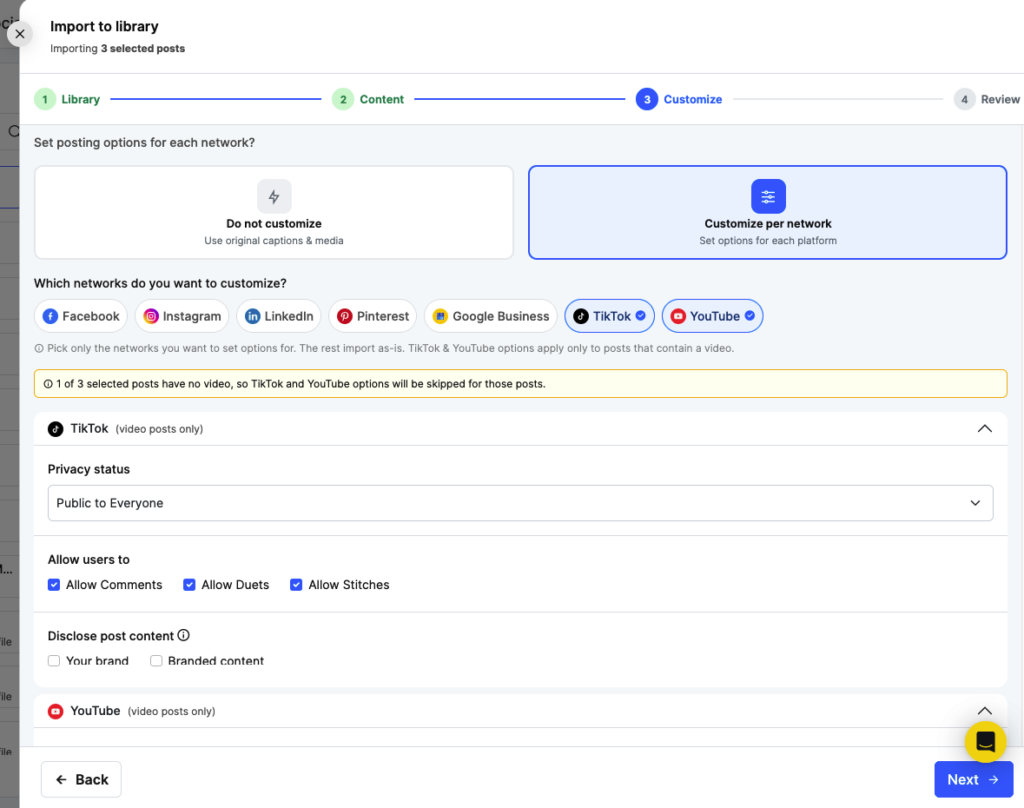
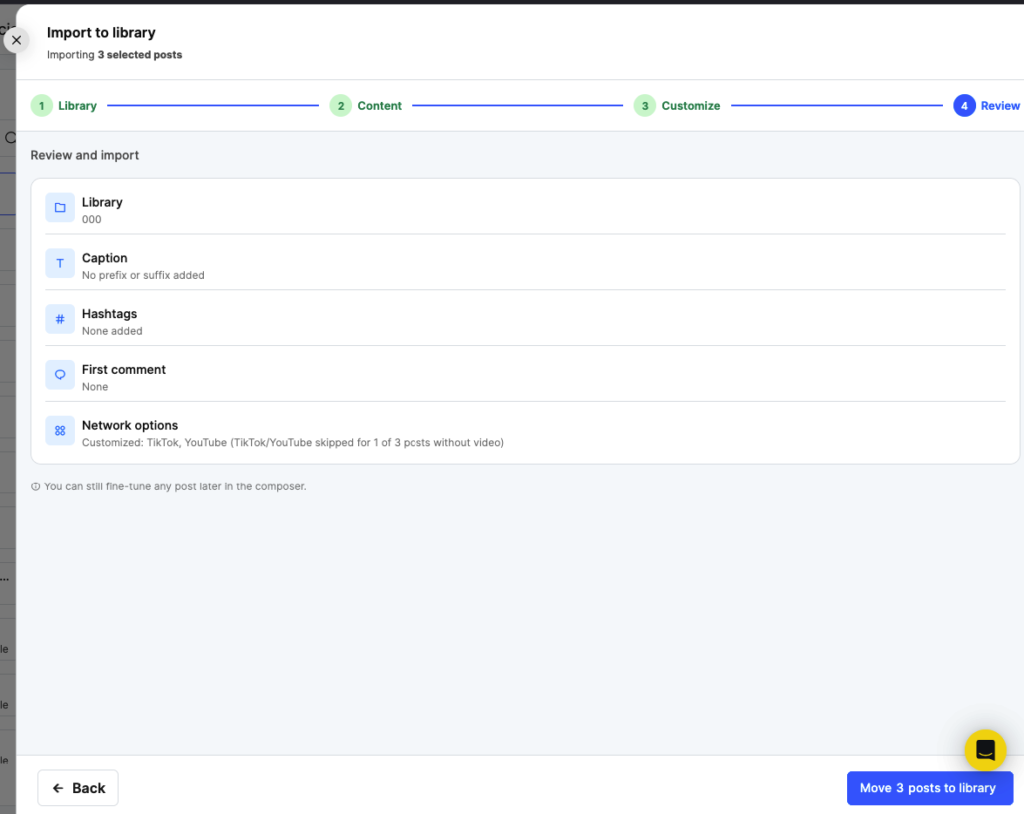
Once you select your posts, RecurPost opens a 4-step import wizard: Library, Content, Customize, and Review.
Step 1: Library
Pick the destination library for your imported posts. You can search by name or scroll through your existing libraries.

Step 2: Content
Add a caption prefix or suffix to all imported posts. You can also attach hashtag collections and add a first comment. The first comment applies to Facebook Pages, LinkedIn, and Instagram Feed posts only.
Step 3: Customize
Set platform-specific options before the posts land in your library. You can choose to import posts as-is or configure settings per network. TikTok and YouTube options apply to video posts only. If a selected post has no video, those settings are skipped for that post.
Step 4: Review
Check a summary of all your selected settings before completing the import. You can still fine-tune any post in the composer after import.
Once you’re ready, click Move posts to library to complete the import.
For a detailed walkthrough of each step, see How to Import Posts into Your RecurPost Library.
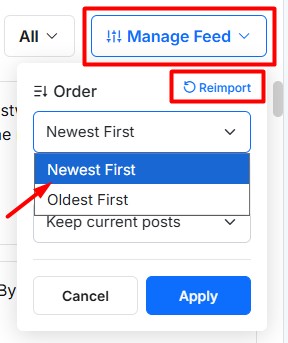
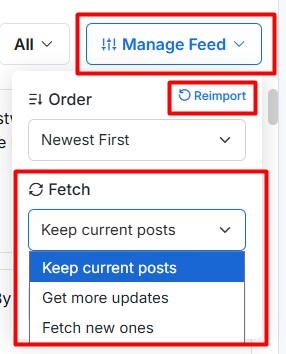
Manage Feed options
The Manage Feed dropdown gives you more control over imported content.
Reimport
The earlier Delete and Fetch Again option is now replaced with Reimport. You can use this option from the Manage Feed dropdown to refresh imported content.
Order
You can sort imported posts by posting date using these options:
- Newest First
- Oldest First
Fetch
You can also choose how imported posts should be fetched:
- Keep current posts
- Get more updates
- Fetch new ones
Timestamps in UTC
Imported post timestamps are shown in UTC. This keeps time references consistent across different accounts and regions.
Once you have selected the posts that you want to import, RecurPost will ask you to choose the library where those posts should be saved. You can also check out our video tutorial here.
5. How to Use the Custom Fields Plug-in?
‘Custom Fields’ is a feature that allows you to save account-specific information in different categories that may later be added to posts. ‘Custom fields’ can help to reduce the time-consuming job of manually entering these details into otherwise comparable posts while producing and scheduling posts for each profile.
When you manage multiple social profiles and want the branding and messaging to be consistent, certain details, such as addresses, contact information, taglines, URLs, signatures, ID numbers, email addresses, legal disclaimers, and so on, must be customized to meet the needs of each profile. Custom fields are a feature for you.
To add the custom fields, you need to go to plug-ins and click on the ‘Manage‘ option under ‘Custom Fields’.
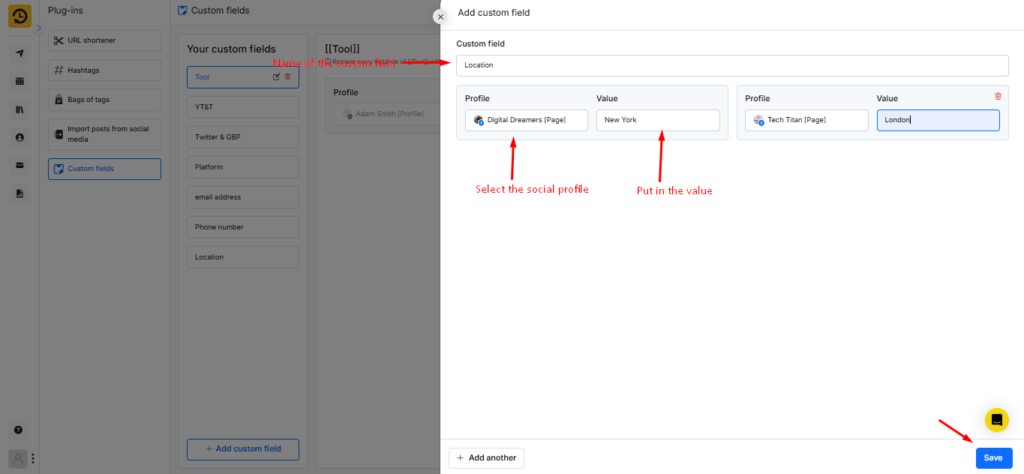
Once you have saved this custom field, you can easily add these values to your post while scheduling a one-off post from the dashboard or adding a post to the library. You will be able to view the option to add the custom field in your post when you are creating a one-off post or adding a post to the library.
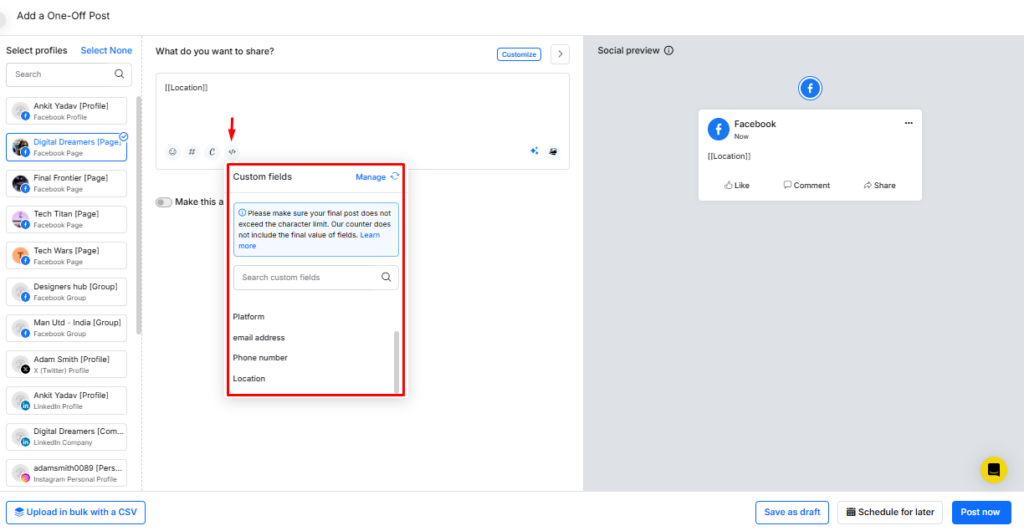
The values you added in the custom field may not appear while creating a post. However, they should be available on your social profiles once your post is published using RecurPost. RecurPost will count the characters in your custom fields, whereas social platforms will count the characters of your custom field value.
Read more…To learn how the custom fields feature works.
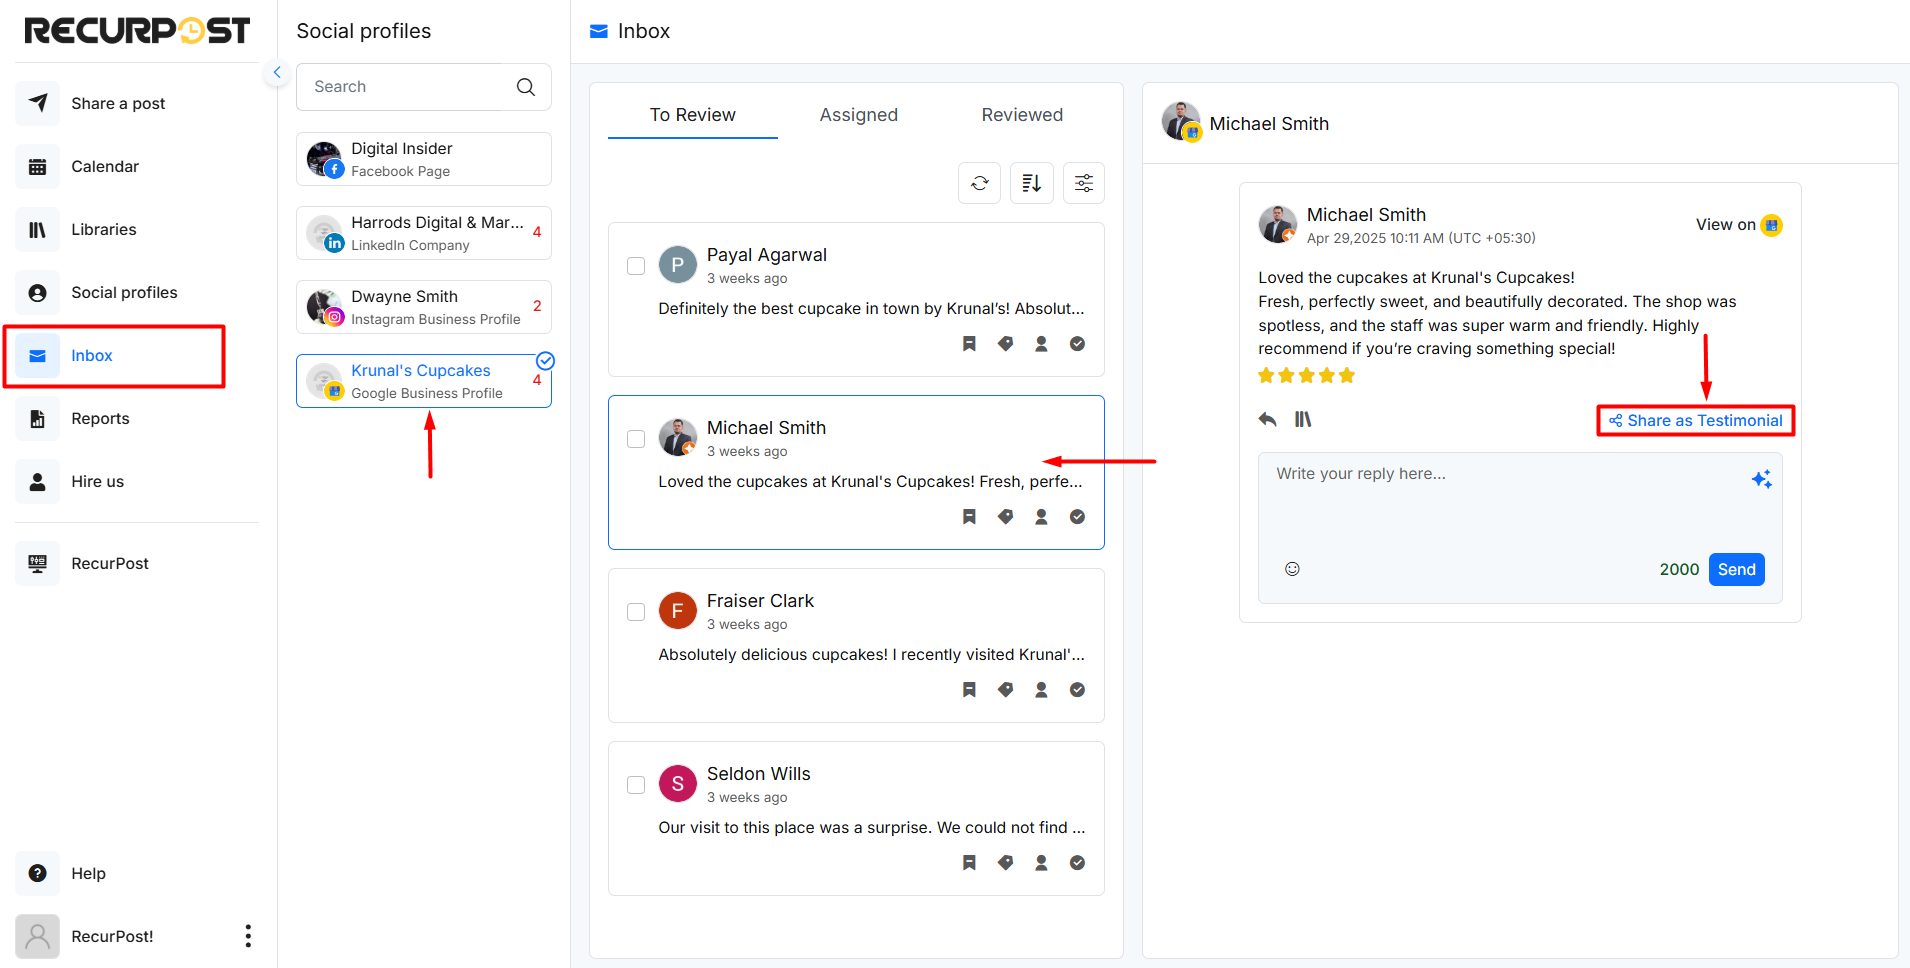
6. Create Testimonial Templates for Google Business Profile (GBP) review
This powerful feature will make it easier to highlight customer feedback from your Google Business Profile (GBP) reviews. With the Testimonial Image with Templates Using AI feature, you can instantly transform positive GBP reviews into visually appealing images and share them across your social profiles via RecurPost.
How to Use This Feature?
1. Open the Inbox and select the GBP review to share.
2. Click Share the Testimonial.
3. The editor opens with a Choose Template area.
- Design update: the Choose Template experience is now refreshed, so templates are easier to browse and select.
4. Pick a template. The review text will appear inside the selected template.
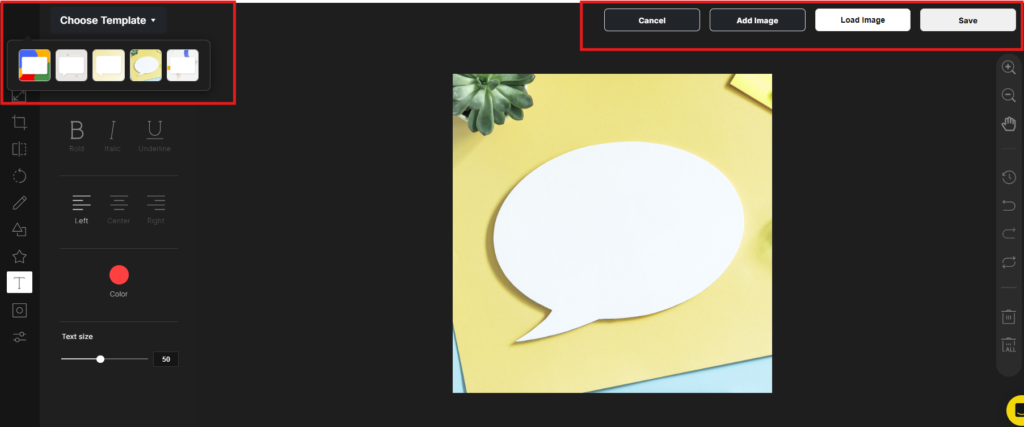
5. If needed, add branding:
- Use Add Image to place a logo or visual inside the design
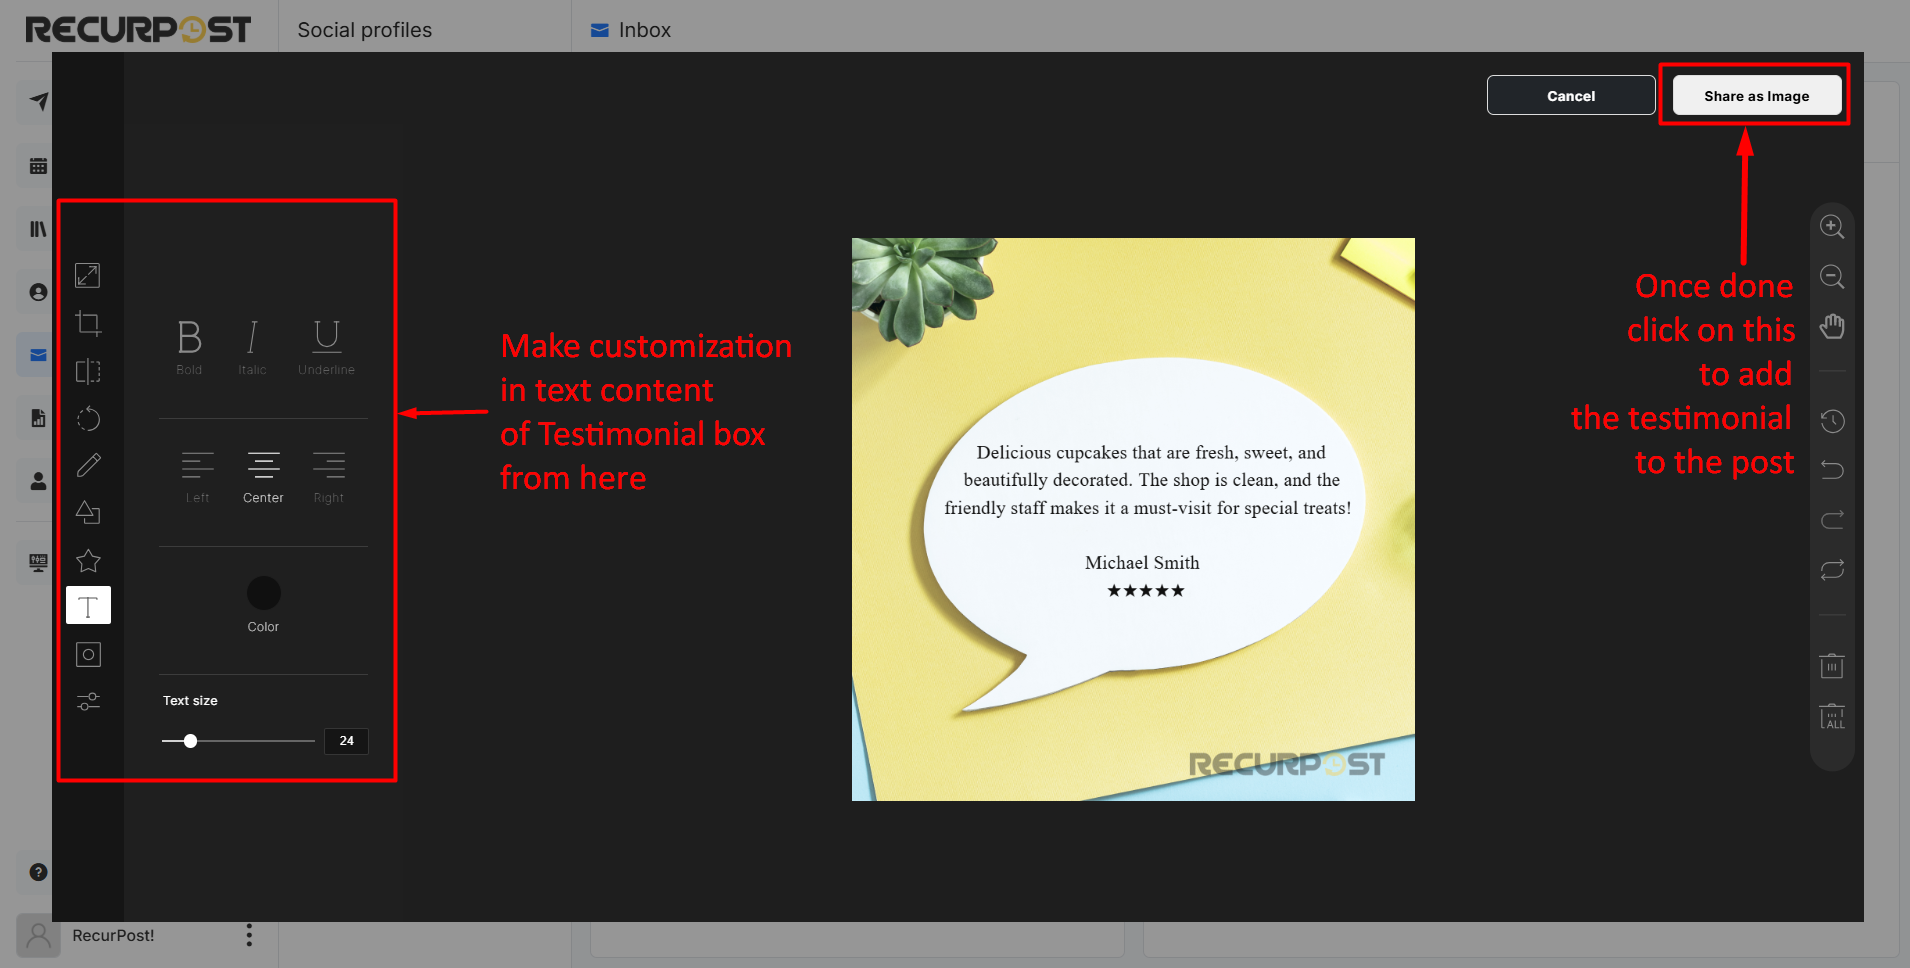
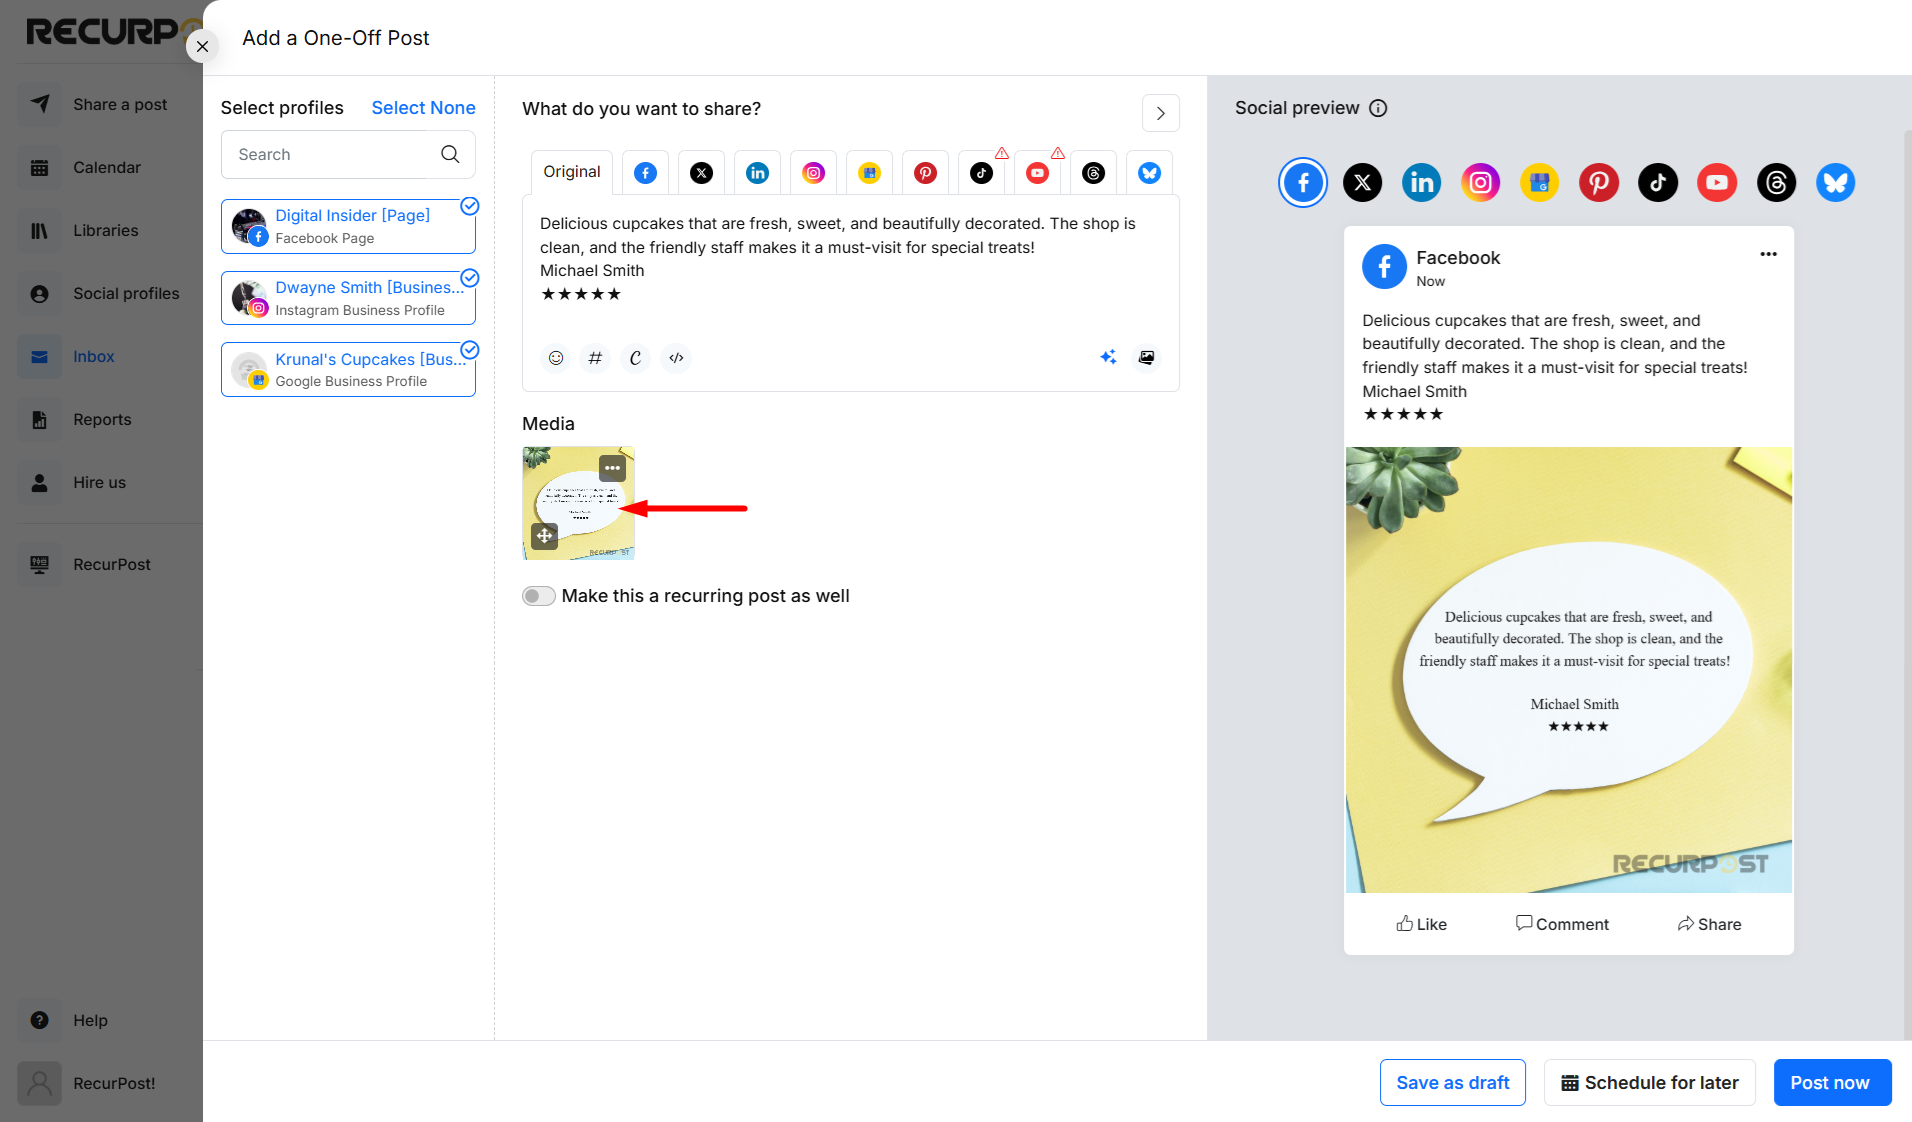
6. Save the testimonial image, then choose the social profile(s) where it needs to be published.
7. Schedule the post.
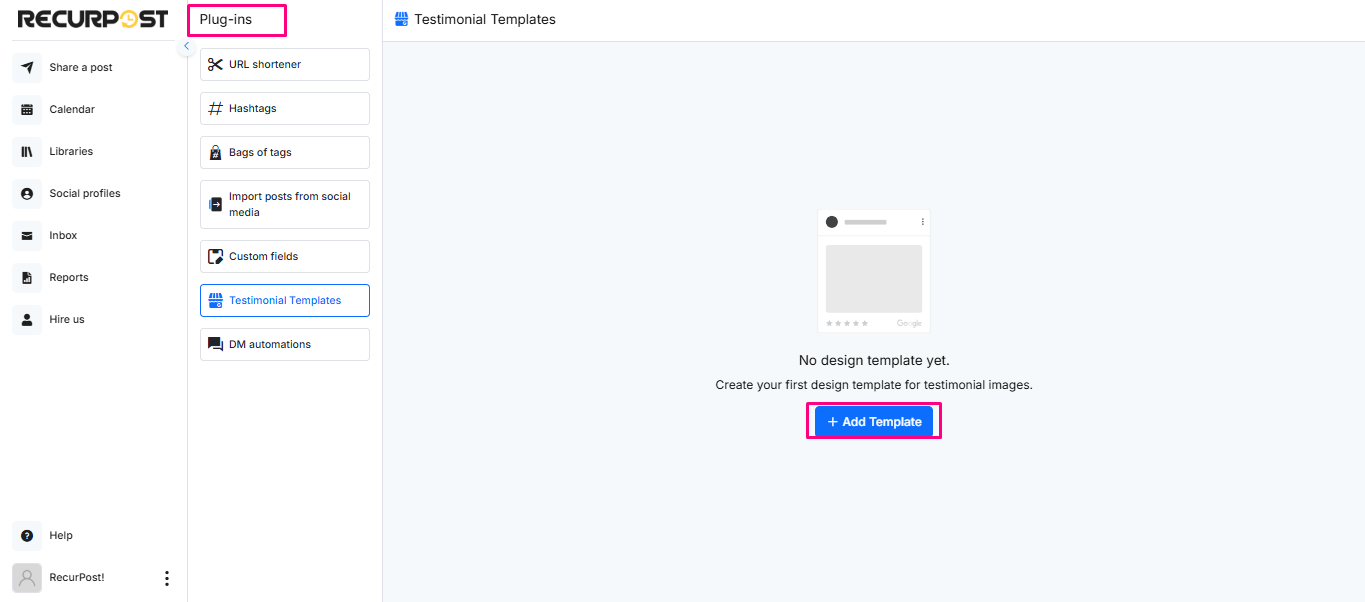
Manage or create templates
To create a new template or edit an existing one:
- Go to Plug-ins.
- Find Testimonial Templates and click Manage.
- Update your templates, then save.
How does this benefit your workflow
- Faster content creation: one review becomes a post-ready image in minutes.
- More trust in social: real customer feedback builds confidence.
- Brand-friendly templates: pick a style that matches your look.
- Smoother template selection: the updated Choose Template layout makes picking a template simpler.
- Easy posting: publish to multiple social profiles from one place.
This feature saves time while ensuring you consistently showcase customer appreciation, enhancing your online presence with minimal effort. Try it out and make your positive reviews work for you!
7. How to Use the Labels Plug-in?
Labels let you tag posts by campaign, theme, or content type. Once you tag your posts, you can track how each group performs from the Reports section.
Setting Up Labels
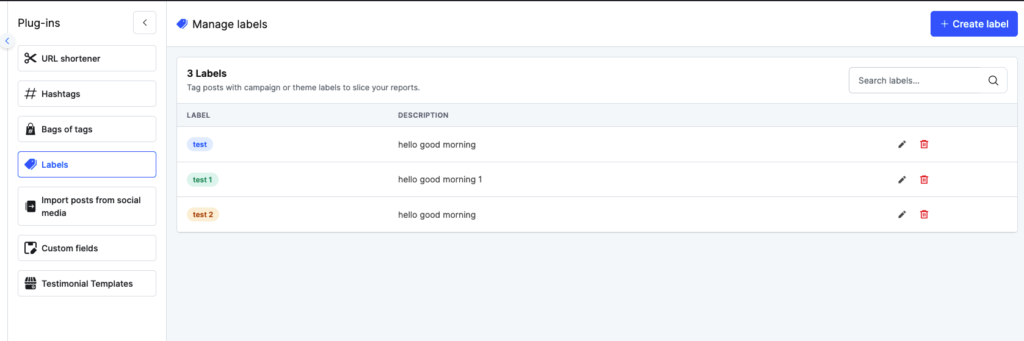
Go to Plug-ins and click Manage under Labels.
This opens the Manage Labels screen. From here, you can create new labels, edit existing ones, or delete labels you no longer need.
To create a label, click + Create label in the top-right corner. Add a name and an optional description, then save.
Adding Labels to Posts
You can add labels to both one-off posts and library posts.
For one-off posts: When composing a post, click the Labels button at the top of the post editor. A dropdown opens with your saved labels. Select one or more labels to tag that post.
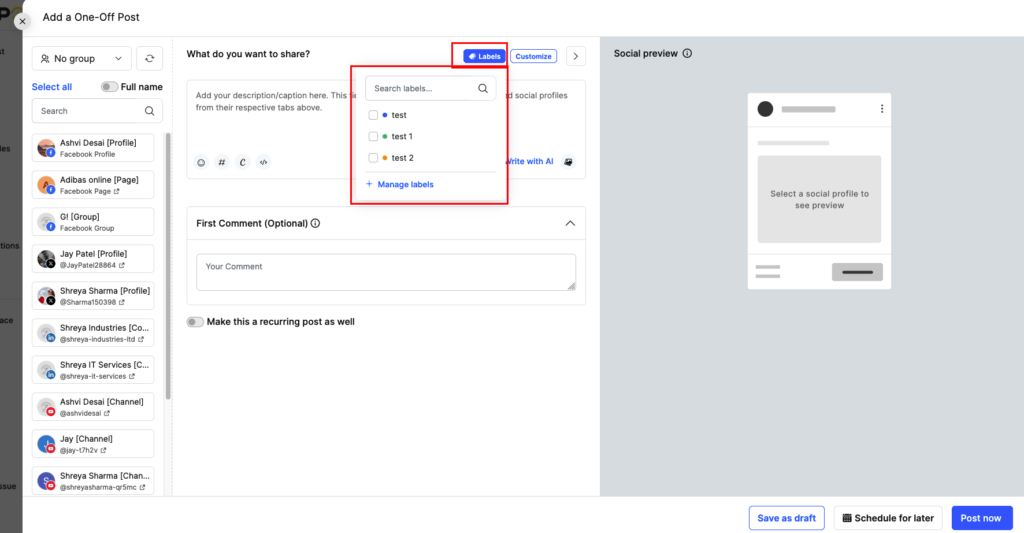
For library posts: Open any post in your library and look for the Labels option in the post editor. Select the labels that apply and save.
You can assign multiple labels to a single post.
Where Labels Appear
Once assigned, labels are visible across the platform:
- Queue: Label tags appear on each scheduled post in the calendar. Use the label filter icon at the top of the Queue to filter posts by label.
- History: Published posts show their labels alongside the post content.
- Library: Labels are visible on posts inside your libraries.

Viewing Label Reports
Go to Reports from the left sidebar and click By Label in the Social Profiles panel.
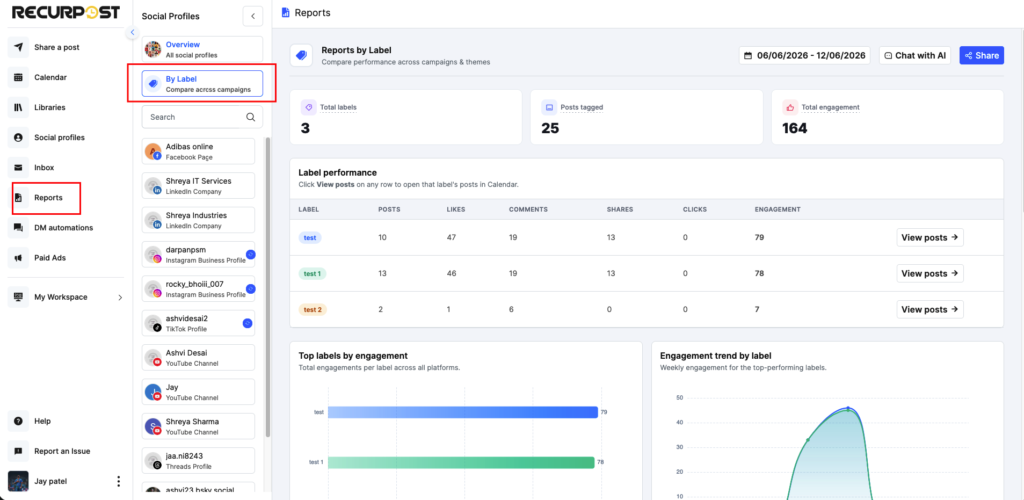
The Reports by Label page shows three summary numbers at the top:
- Total labels: how many labels have you created
- Posts tagged: how many published posts carry at least one label
- Total engagement: combined engagement across all labeled posts
The Label performance table below breaks this down per label, showing posts, likes, comments, shares, clicks, and total engagement for each. Click View posts → on any row to open that label’s posts in the Calendar view.
Two charts sit below the table – a bar chart ranking your top labels by engagement, and a line chart showing how engagement for each label trended over the selected date range.
Use the date picker in the top-right corner to change the reporting period.
We hope this information is helpful to you. In case you have any questions or need help with the Plug-ins, please reach out to us at support@recurpost.com.