
RecurPost helps you schedule YouTube videos, including Shorts and long-form content, to grow your channel efficiently.
How to share a post on YouTube?
1. Connect your YouTube Channel
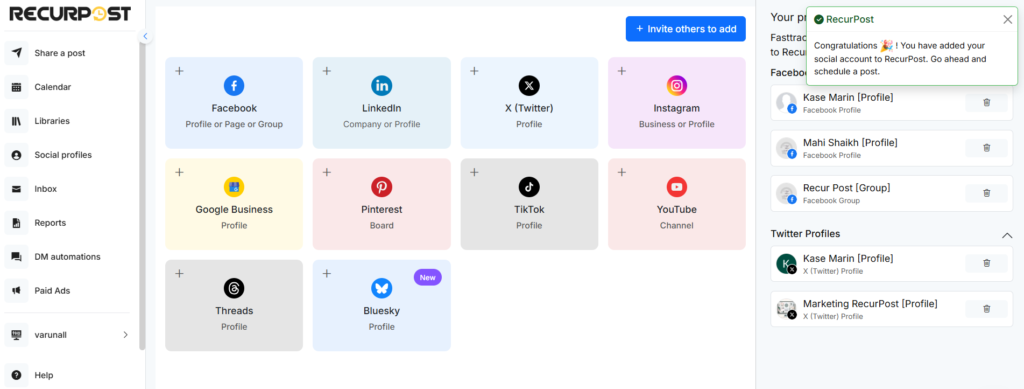
To connect your YouTube account, click on the ‘Social profiles’ menu on the left-hand side and click on the YouTube option. If you already have some profiles on that page, then click on the ‘+ Connect profiles’ button on the top-right side, and then select the YouTube option.

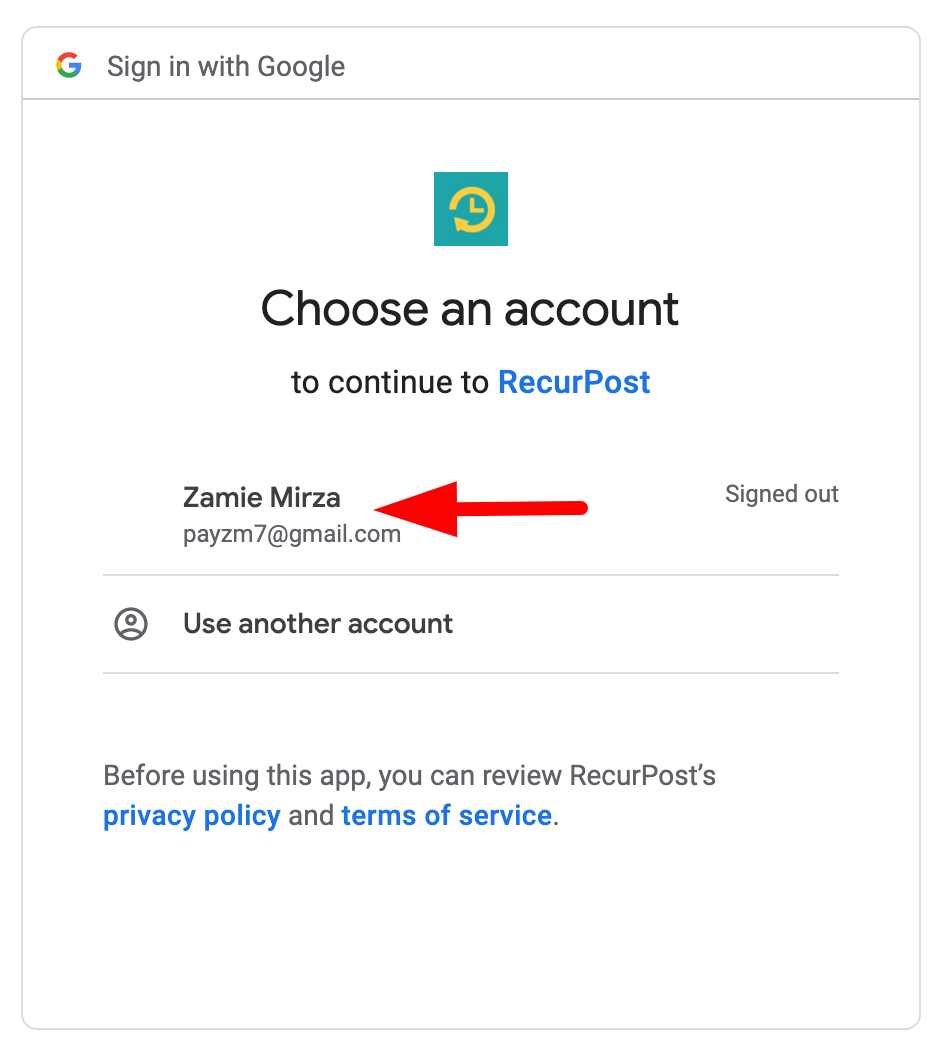
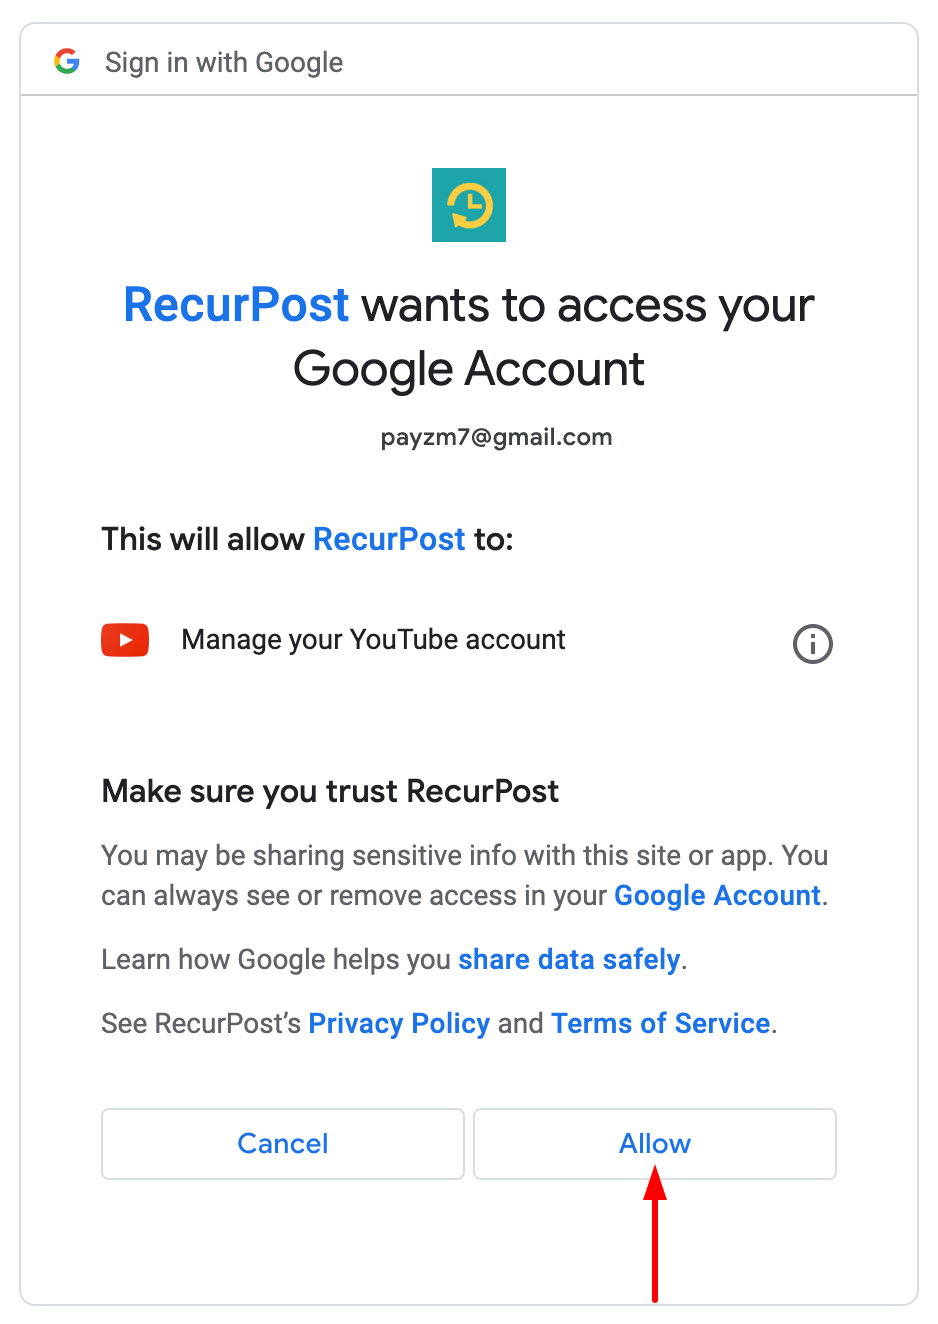
You will be redirected to Google’s login page if you are not already logged in. You need to select the Gmail account associated with your YouTube channel. Provide RecurPost with the required permissions to add and schedule posts on your YouTube account. Please note that no personal data or credentials will be saved.
2. Create a One-off Post
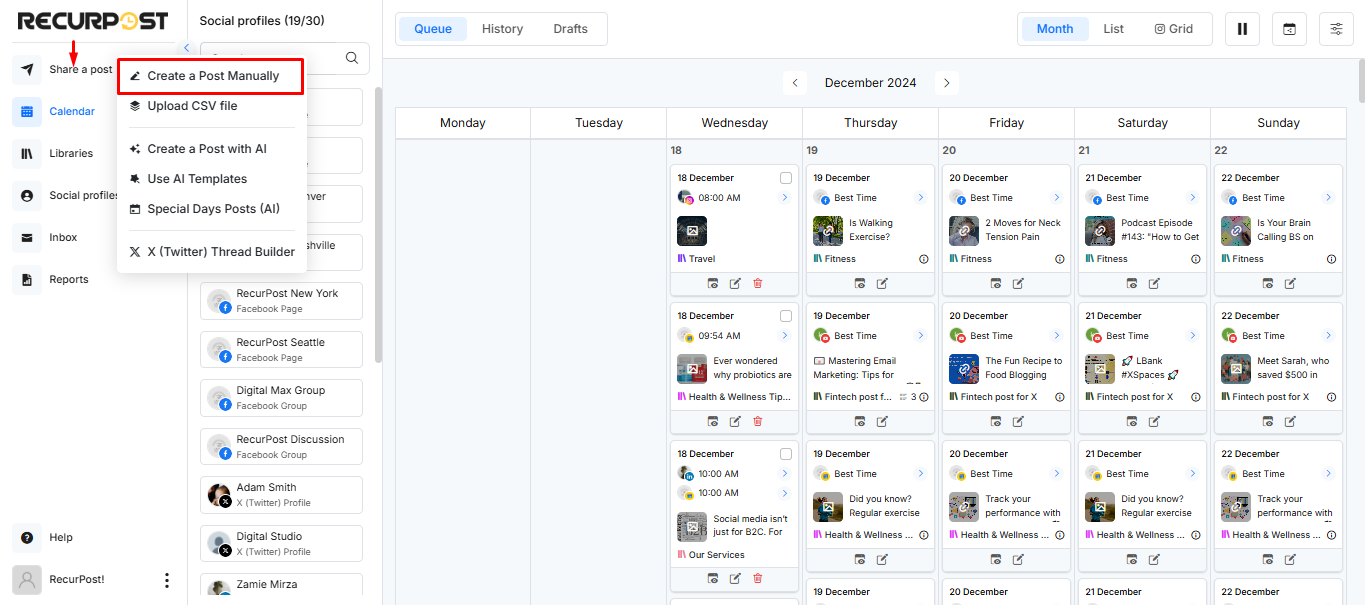
One-off posts are helpful when you want to schedule a single post on multiple accounts. These posts will be shared on your accounts just once. To create a One-off post, click ‘Share a post’ from the left-side menu and select ‘Create a Post Manually‘.
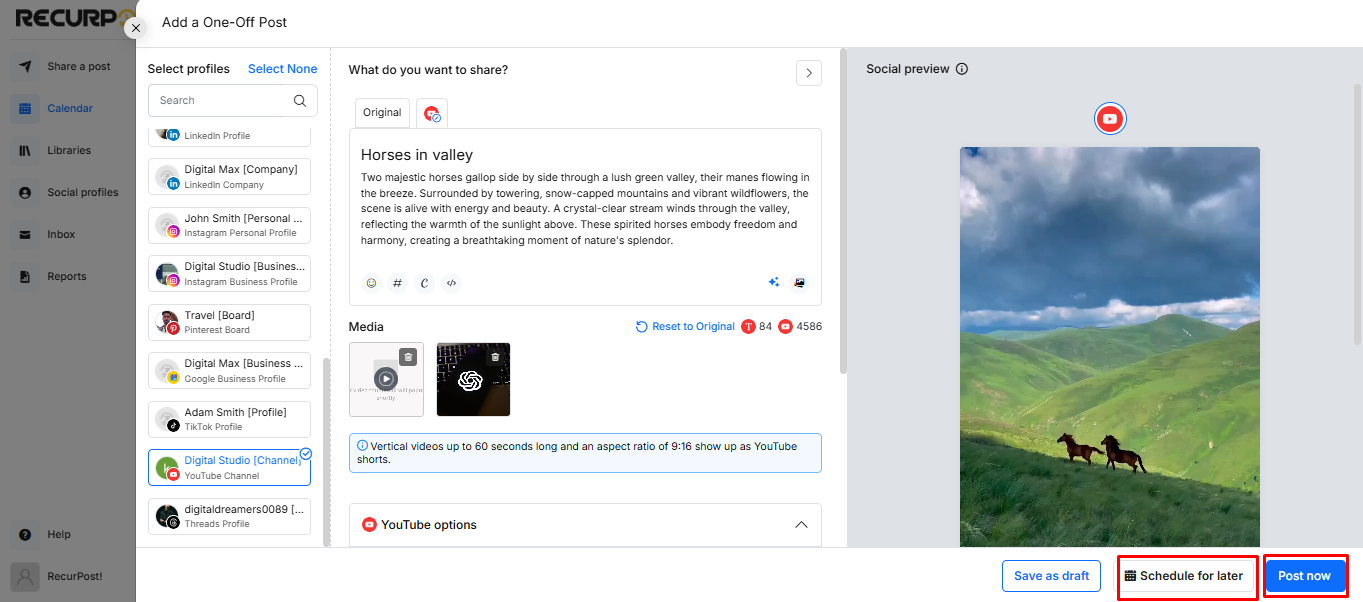
A pop-up window will appear where you will be able to add your content. Add Title, Description, attach video, add hashtags, include emojis, insert a link, and then select your YouTube account that you want to post on.
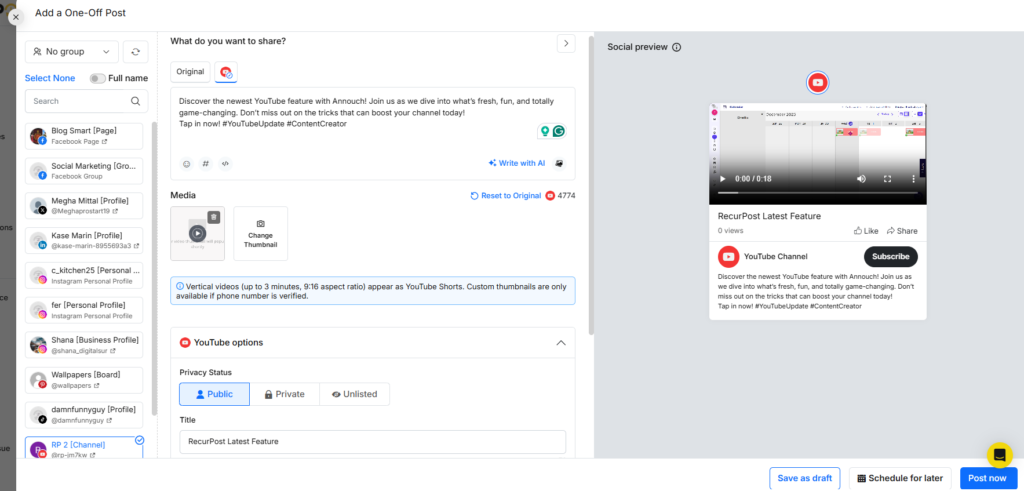
Once ready, either post immediately or schedule it for a specific date and time.
3. Add Content to Libraries
You can fill up your libraries with awesome content and set a recurring schedule to make all that content go out in a loop on your YouTube account. You shall find all your content libraries on the ‘Library’ page.
When you sign up, some libraries will be created by default for you. You can edit or delete them, or create as many new libraries as you want. In these libraries, you will find a lot of options to add recurring posts.

You can add a single post, add images/videos/text/link posts in bulk, add content through a CSV file, import content from a social profile, or set up an RSS feed. Read more…
4. Create a Recurring Schedule
After adding content to your libraries, you need to set a recurring schedule to let the posts go out on your social profiles. To set a recurring schedule, go to the library and go to the ‘Time slots’ section. Then click on ‘+ Add recurring time slots’ button.

Here, you can select the frequency at which you want your posts to go out. Choose an option between Daily/Weekly, Monthly, or Custom, set the time, and click on the ‘Add time slot’ button.

That’s it. All the posts in your libraries will be posted according to the set schedule(s).
Now let’s see how your YouTube posts will appear once posted through RecurPost.
How will YouTube posts appear?
Videos will appear on your YouTube channel with features like Title, Description, Privacy Status, Content Category, and Tags that are provided by RecurPost. You can upload a video using the ‘ADD MEDIA’ option.
RecurPost shows a live YouTube preview while you write your post.
- Regular YouTube videos show the normal YouTube video preview.

- YouTube Shorts show a Shorts-style vertical preview (mobile player layout with the Shorts actions).
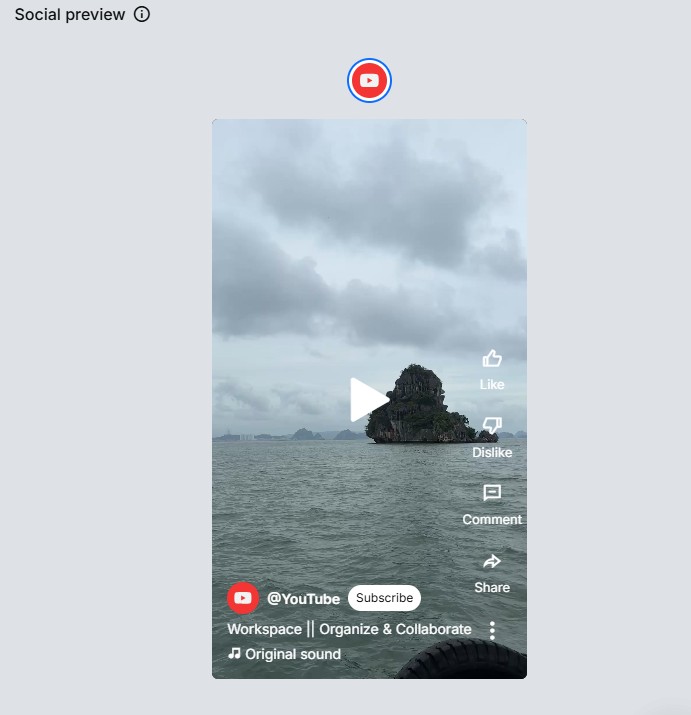
After publishing, YouTube decides the final layout.
Note: YouTube treats an upload as a Short when the video is square or vertical and up to 3 minutes long.
YouTube Default Category Setting
You can now set a default YouTube content category for each social profile inside RecurPost. To do this, go to Social Profiles → Settings and choose your default category (for example, Science & Technology, Education, Entertainment, etc.). This ensures your videos always publish under the correct category without needing to select it every time. It’s especially useful for creators managing multiple channels with different content types.
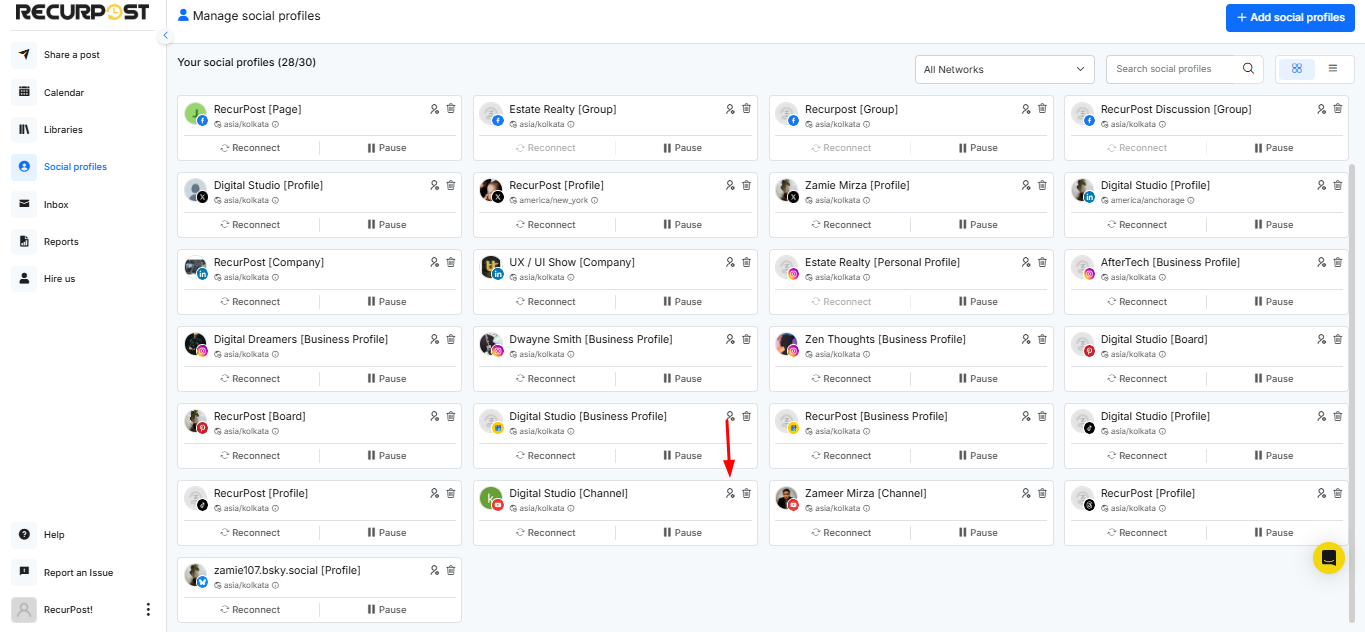
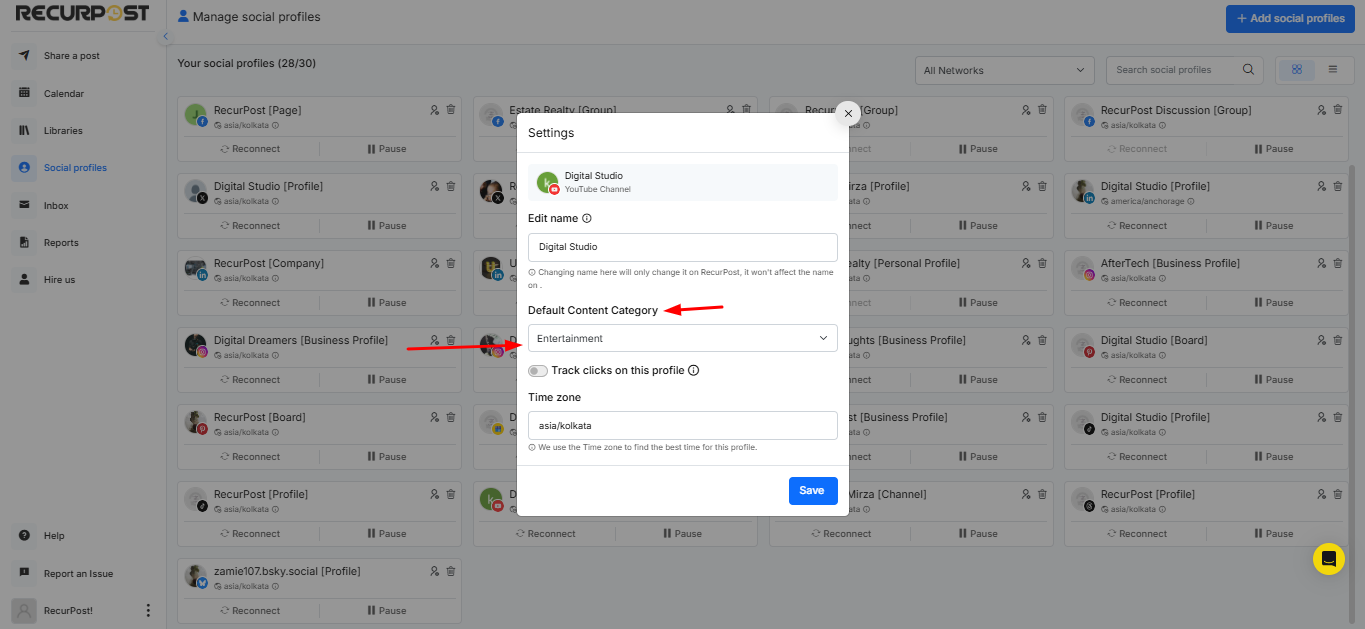
Note: Any 9:16 vertical video up to 3 minutes (180 seconds) long will be posted as a YouTube Short.
Advanced Publishing Options
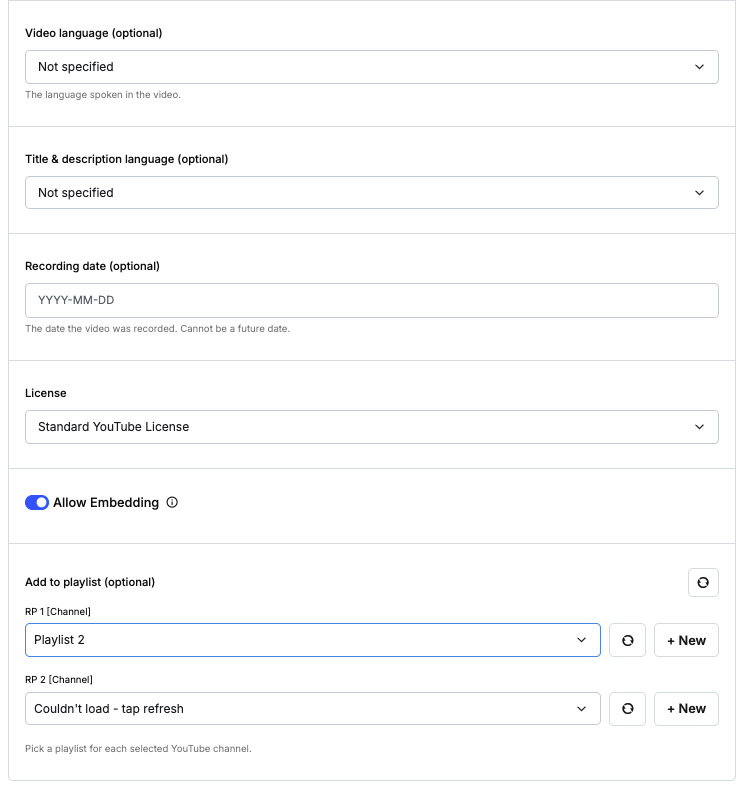
RecurPost now gives you more control over how your videos get published on YouTube. When creating or scheduling a post, you’ll find these extra fields in the publishing panel.
Video Language
You can set the language spoken in your video. This helps YouTube categorize your content and surface it to the right audience.
Title & Description Language
Set the language of your title and description separately from the video language. This is useful when your spoken content and written metadata are in different languages.
Recording Date
Add the original date the video was recorded. This is optional metadata that gets passed to YouTube along with your upload.
License
Choose the license that applies to your video. Two options are available:
- Standard YouTube License: The default YouTube license.
- Creative Commons – Attribution: Allows others to reuse your video with credit.
Allow Embedding
A toggle lets you control whether your video can be embedded on external websites. Turn it off if you want playback restricted to YouTube only.
Add to Playlist
You can now add your video to a playlist while scheduling it. Playlist selection works per connected YouTube channel, so if you have multiple channels linked, you pick a playlist separately for each one.
Use the refresh icon to pull in the latest playlists from your channel. You can also create a new playlist directly from this screen using the + New button.
Note: Playlist options load per channel. If a channel shows “Couldn’t load – tap refresh,” use the refresh icon to fetch the latest playlists.
Delete a YouTube Post from History
Made a mistake after publishing? No problem. You can now delete a YouTube post right from inside RecurPost.
You don’t need to open a separate tab or log in to YouTube separately. The delete option lives inside the History section, where you already track your published content.
Here’s how to do it:
- Go to the Calendar and click on the History tab.
- Find the YouTube post you want to remove and click on it.
- A panel will open on the right side showing the post details.
- Click the Delete Post button under the YouTube channel entry.
That’s it. The post gets removed without any extra steps.
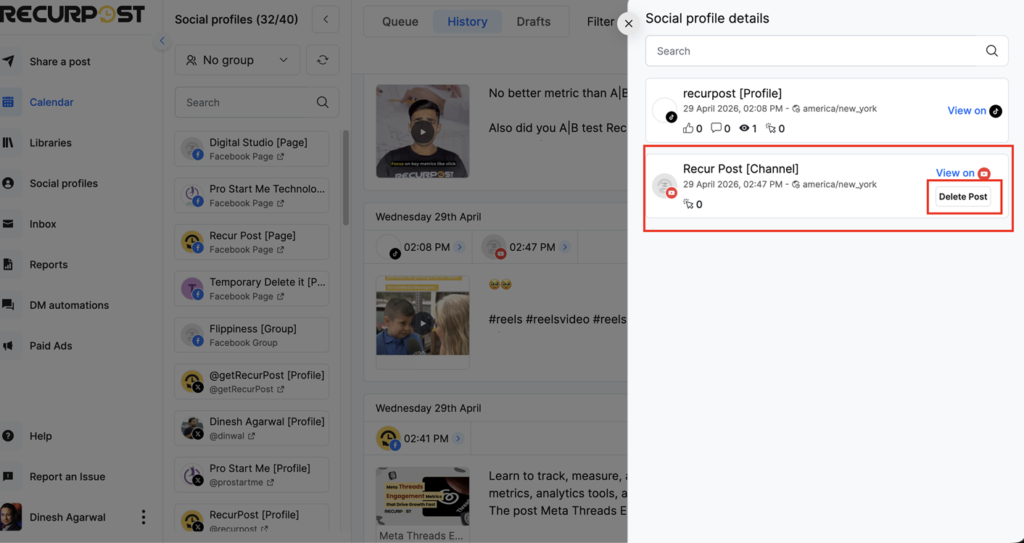
Note: This action permanently deletes the post from your YouTube channel. Make sure you want to remove it before clicking Delete Post.
That’s how you can schedule posts on a YouTube account using RecurPost! For further queries, contact us at support@recurpost.com.
Connecting and managing YouTube channels
What can be published from RecurPost?
RecurPost supports scheduling:
- Long-form YouTube videos
- YouTube Shorts (posted automatically based on the video format and length)
Two posting styles are available:
- One-off posts (post once)
Useful for a single scheduled upload (for example, a weekly episode or announcement). - Library-based recurring publishing (repeat on a schedule)
Useful for evergreen videos that should rotate over time (for example, older tutorials, product demos, FAQs). Libraries can be filled in multiple ways, then shared using recurring time slots.
Video and Shorts requirements
Shorts vs standard video
How YouTube decides a Short (important update):
For most standard channels, YouTube categorises a video as a Short if:
- It was uploaded on or after 15 October 2024, and
- It has a square or vertical aspect ratio, and
- It is up to 3 minutes long.
RecurPost also notes that vertical videos up to 3 minutes are treated as Shorts when posted.
Aspect ratio and resolution
- On desktop, YouTube’s standard viewing aspect ratio is 16:9, but other aspect ratios are supported and the player adjusts automatically.
- YouTube recommends at least 1280×720 for content in 16:9, but does not set a single minimum resolution for all videos.
Video length limits
- By default, YouTube uploads are limited to 15 minutes until the account is verified.
- Verified accounts can upload longer videos, up to 12 hours or 256 GB (whichever is less).
Music note for longer Shorts
If a Short is over one minute and has an active Content ID claim, YouTube may block it globally (no channel penalty, but the video won’t play until it is resolved). This is a YouTube rule, not a RecurPost setting.
Connect a YouTube channel in RecurPost
To connect a YouTube channel:
1. Open Social Profiles in RecurPost.
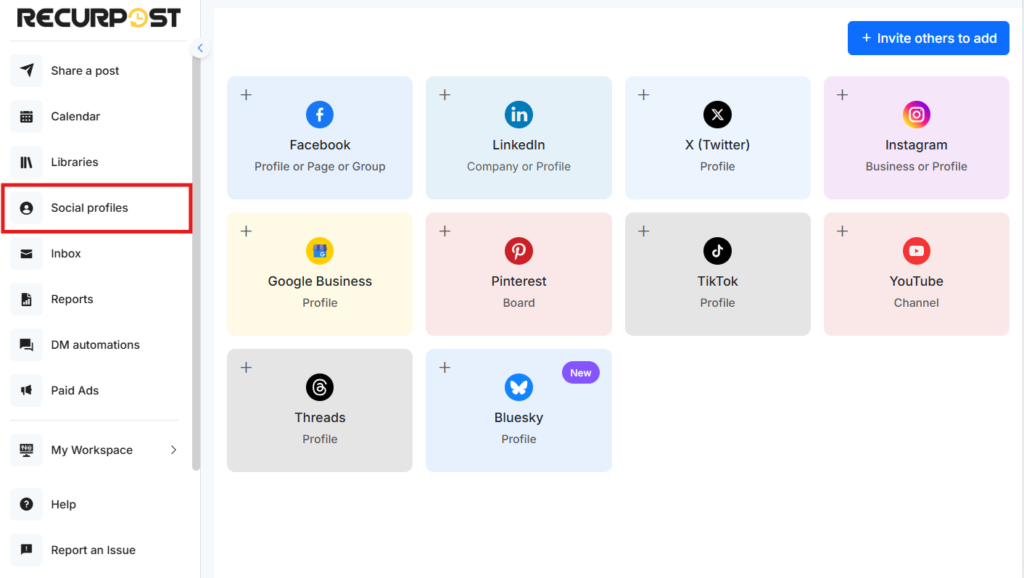
2. Select YouTube (or invite others to add their YouTube account).
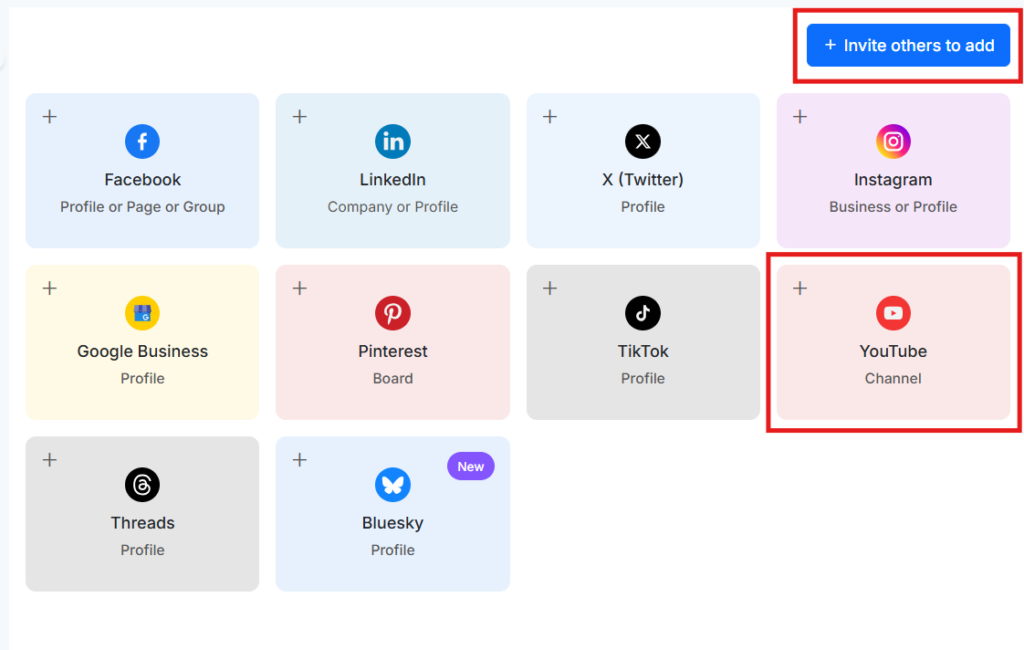
3. Complete the sign-in flow (select the account linked to the YouTube channel).
4. Approve the requested permissions so RecurPost can schedule posts to the channel.
5. Confirm the connection message once the channel is added.
Note: RecurPost does not save personal data or login credentials during this connection process.
Schedule a YouTube video or Short
Schedule a one-off post
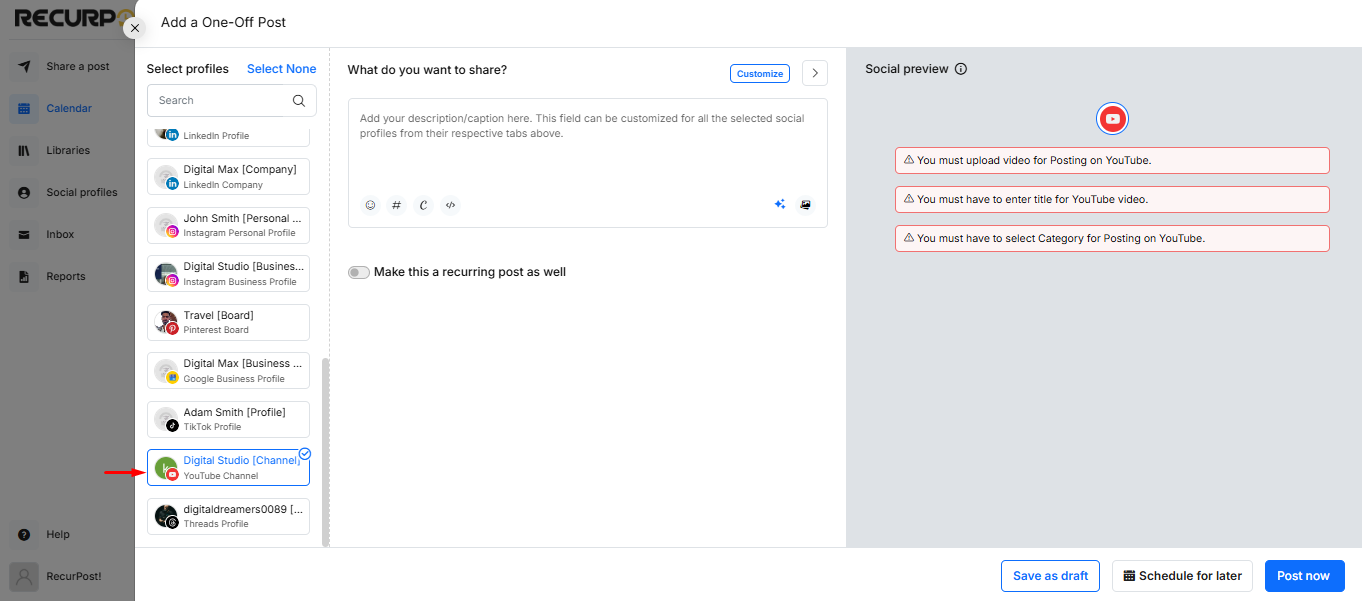
1. From the dashboard, select Share a post and choose to create a one-off post.
2. Select the connected YouTube channel.
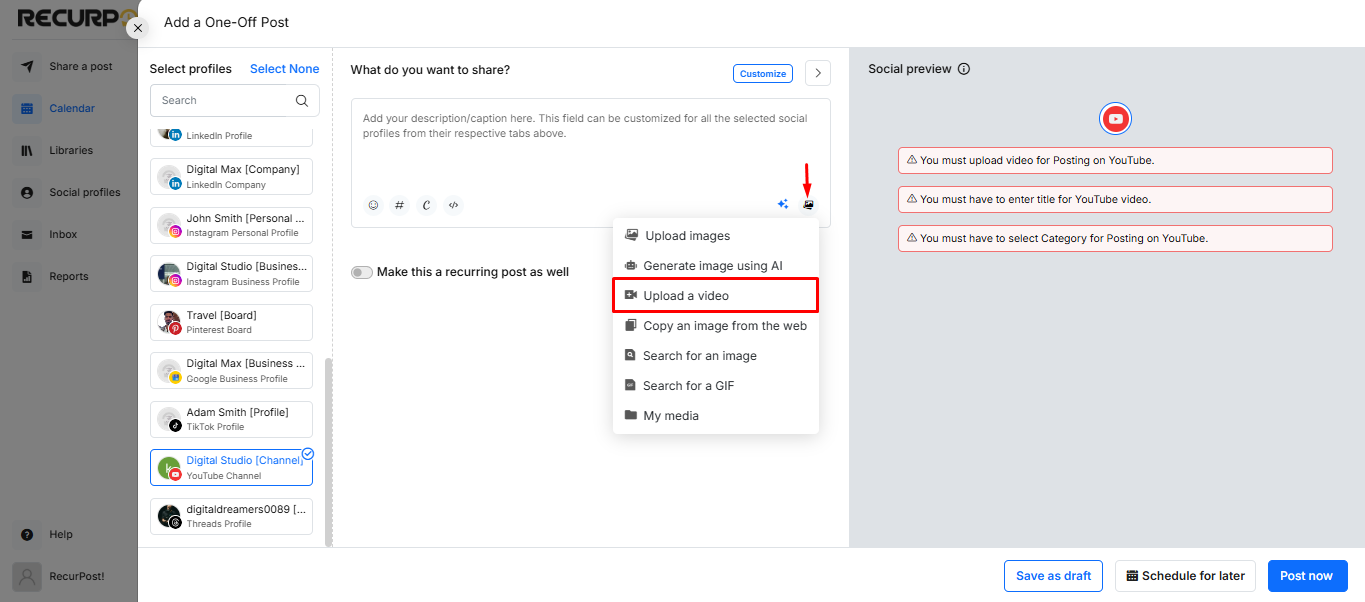
3. Upload a video from the media options.
4. Add the required details (typical fields include title, description, and optional additions such as hashtags).
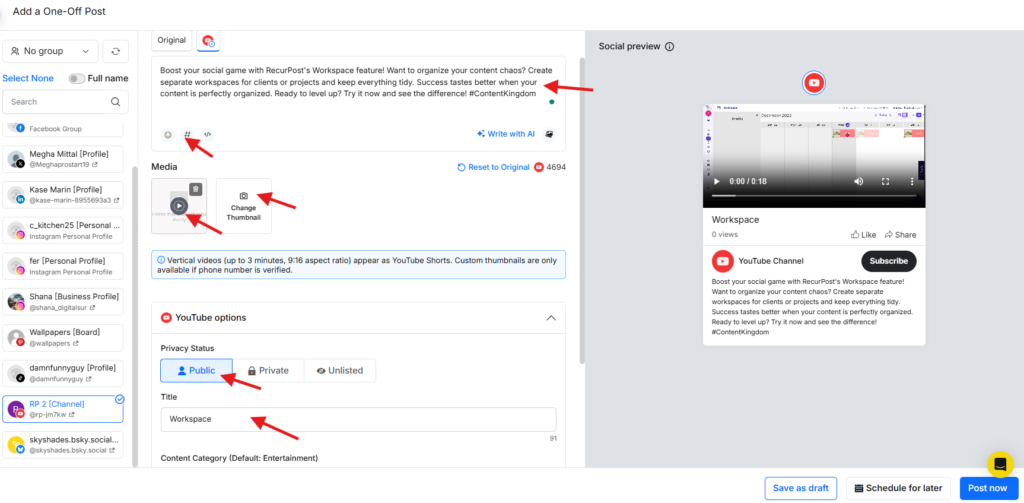
Keep the title within YouTube’s 100-character limit.
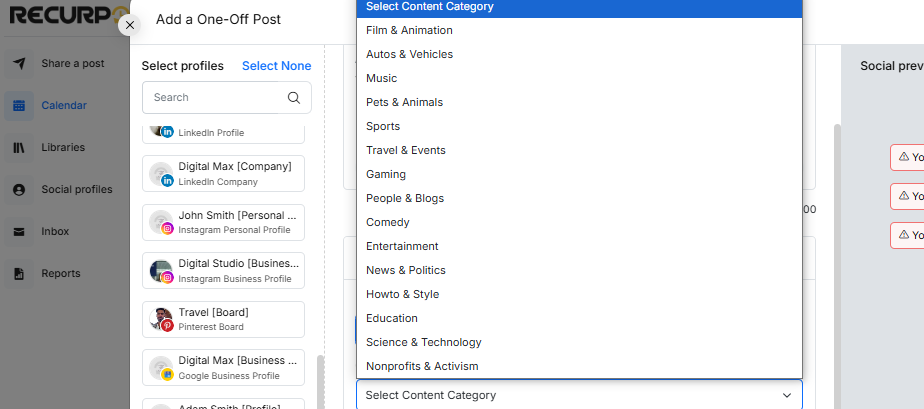
5. Choose a content category (or rely on a default category if one is set).
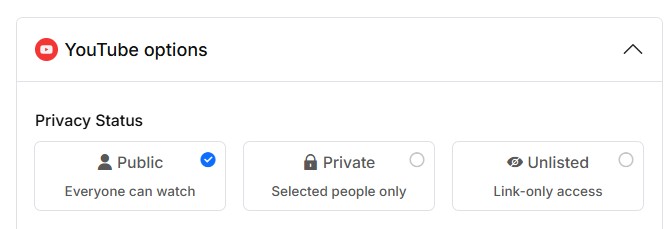
6. Choose a privacy status (Public, Private, or Unlisted).
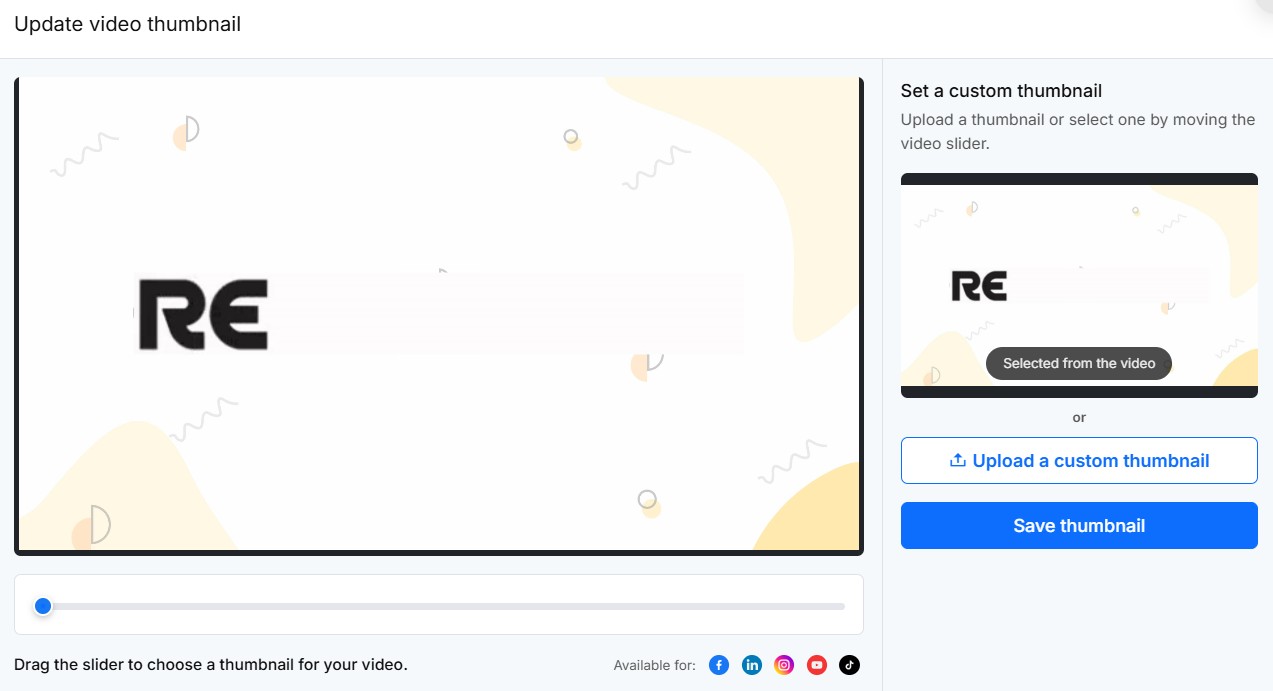
7. Optionally upload a thumbnail.
8. Select Post now or schedule it for a future date and time.
How RecurPost handles Shorts automatically
No separate “Shorts” toggle is required. Shorts are published based on the uploaded video’s format and length, matching YouTube’s Shorts categorisation rules.
Advanced video publishing options
When scheduling a YouTube video, RecurPost now includes additional metadata fields beyond title, description, and privacy. Here’s what each one does.
Video Language
Specifies the language spoken in the video. YouTube uses this to better understand and index the content.
Title & Description Language
Sets the language of your video’s written metadata. You can set this separately from the video language – useful for multilingual publishing workflows.
Recording Date
An optional field for the date the video was originally recorded. Format: YYYY-MM-DD. Cannot be a future date.
License
Two options:
- Standard YouTube License: Default for all uploads.
- Creative Commons – Attribution: Marks the video as reusable with credit.
Allow Embedding
Controls whether the video can be embedded on third-party websites. Enabled by default.
Add to Playlist
Let’s you assign the video to a playlist at the time of scheduling. Playlists are listed per connected YouTube channel. If you have two channels linked (for example, RP 1 and RP 2), you select a playlist for each one independently.
- Use the refresh icon next to each channel to reload the playlist.
- Use + New to create a playlist without leaving RecurPost.
Note: These fields are available on the RecurPost web app. Playlist selection is shown per channel; each connected channel gets its own dropdown.
Privacy, category settings, and common issues
Privacy settings explained
YouTube visibility options behave like this:
- Public: Visible to anyone and can appear in search results and recommended lists.
- Unlisted: Anyone with the link can watch and share, but it isn’t shown publicly in the same way as public videos.
- Private: Only visible to the uploader and people explicitly granted access (and some features, like & comments, may not be available).
Set a default YouTube category for faster scheduling
For teams managing multiple channels (or different content types), a default category reduces repetitive work.
To set it:
- Go to Social Profiles → Settings
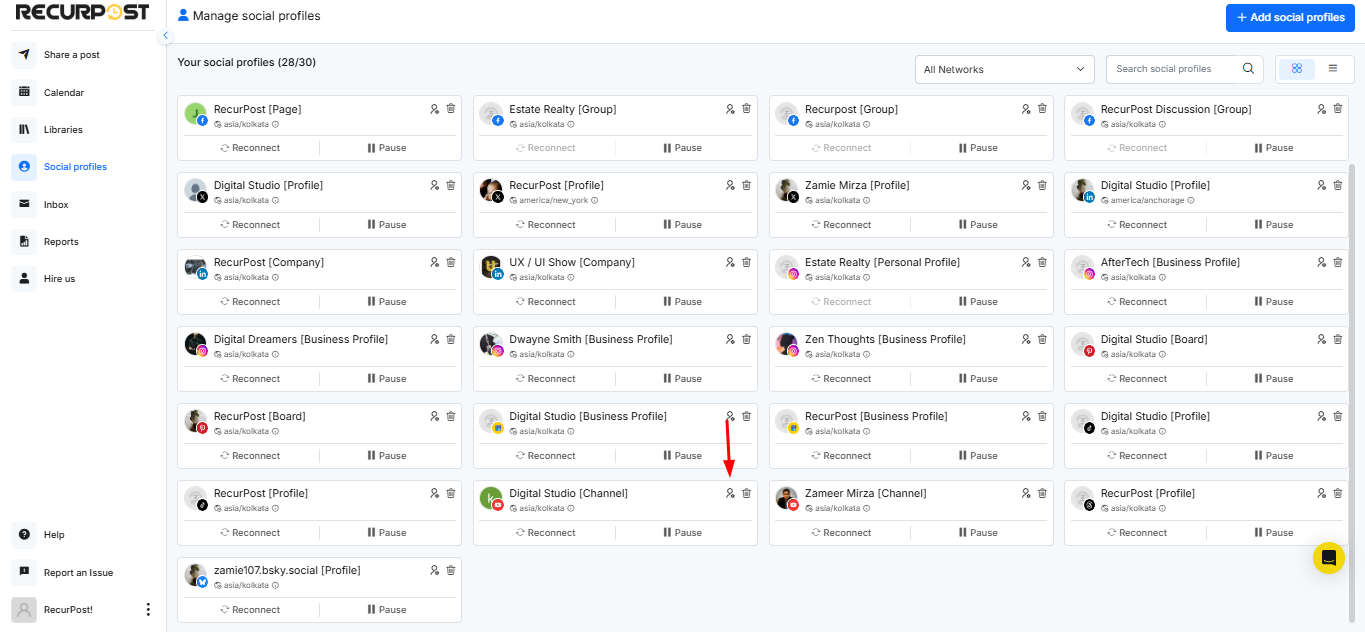
- Select the default category for the YouTube account (for example, Education or Science & Technology)
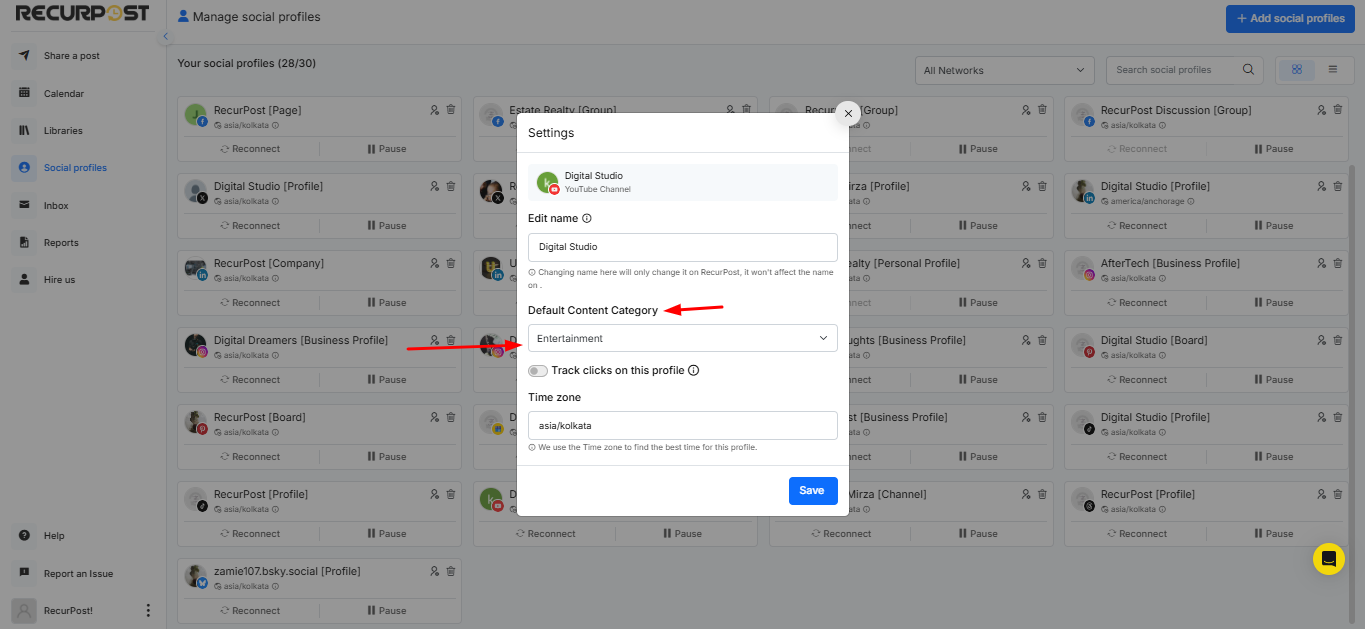
The category can still be changed per post when needed.
Common issue: Why didn’t this upload become a Short?
Check these first:
- The video is square or vertical, and 3 minutes or less.
- The video was uploaded after 15 October 2024 (older uploads may remain long-form even if they match the format).
- If the Short is over one minute and uses claimed music, it may be blocked due to Content ID rules.
Extra optimisation tip that’s often missed
YouTube allows tags, but YouTube states they usually play a minimal role in discovery unless the topic is commonly misspelled. So strong titles and descriptions usually carry more weight than trying to “stuff” tags.
Delete a Published YouTube Post from RecurPost
Sometimes a video needs to come down after it goes live. Maybe the content needs a fix, or the timing was off. Either way, you no longer have to go to YouTube separately.
RecurPost now lets you delete a published YouTube post right from the History section.
Here’s how:
- Head to the Calendar and open the History tab.
- Find the YouTube post you want to delete and click on it.
- A details panel opens on the right side.
- Look for the YouTube channel entry and click Delete Post.
The video gets taken down from your YouTube channel without leaving RecurPost.
Note: This permanently deletes the video from your YouTube channel. Double-check before you hit Delete Post, there’s no way to undo this.