
To make your scheduling experience even better, we are here with an amazing feature called ‘Workspace’. Workspaces come in handy when you manage multiple clients or work with multiple team members.
Workspaces enable you to do the following:
- Create separate spaces for managing different sets of social profiles and libraries.
- Easily distinguish between social profiles of multiple clients by organizing them into different workspaces.
- Invite team members to manage desired workspaces.
- While inviting team members, grant access to selected social profiles and libraries.
- From the same dashboard, you can manage your personal workplaces as well as those shared by others.
You will be able to quickly organize your social profiles and distribute work with this function. Best for freelancers and agencies who are managing the social profiles of multiple clients. Content approvals inside Workspaces now also trigger email notifications, so reviewers and owners stay in the loop without constantly checking the dashboard. The workspace feature will also be available on RecurPost’s mobile application, available for Android and iOS.
Sounds quite interesting, right?
Let’s see how you can use the Workspace feature in detail.
Setting up your Workspace
Once you create your RecurPost account, a default workspace called ‘My Workspace’ is created for you. This workspace cannot be changed or removed. All of your linked social profiles and libraries will be displayed here.
You can create an unlimited number of workspaces and invite others to manage them as per your plan. If you want to add more team members to your workspace than what you get in your plan, you can always purchase the add-ons
While you are in the created workspace, you will only be able to see the selected social profiles and libraries. All the data on the Calendar, Libraries, Inbox, and Reports will be customized according to the workspace you are in. To see all the social profiles and libraries connected to RecurPost, go to ‘My Workspace (Default)’ again.
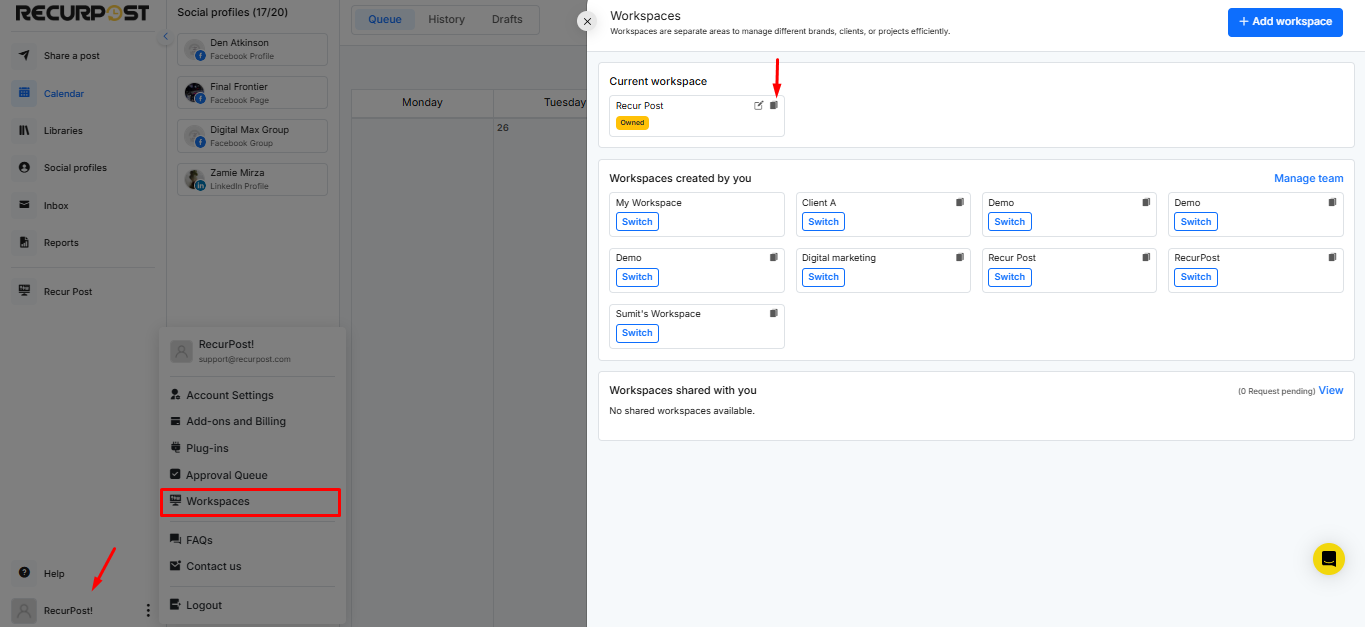
1. Creating a New Workspace
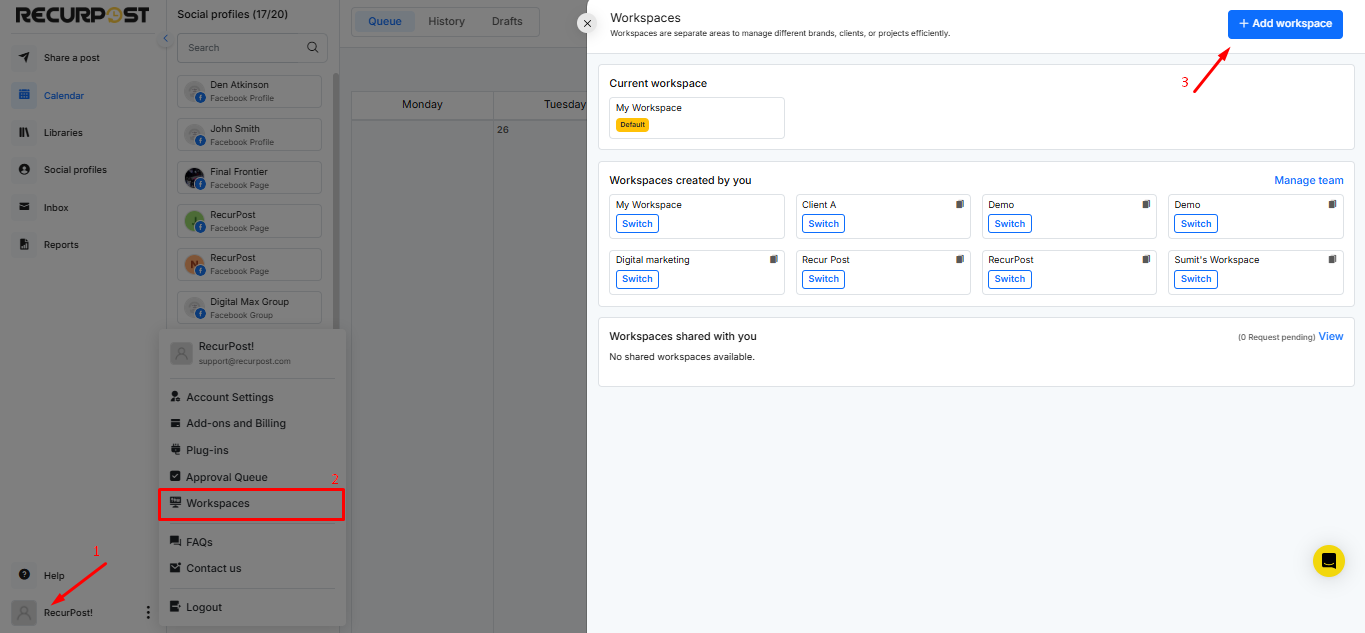
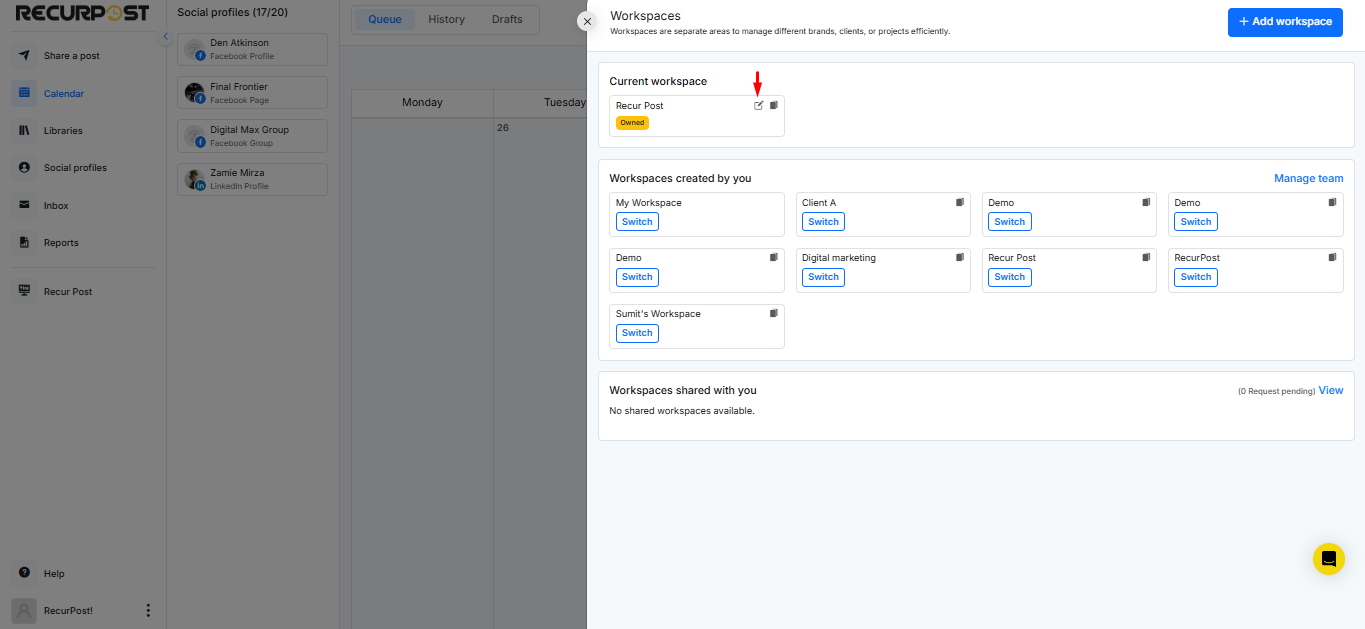
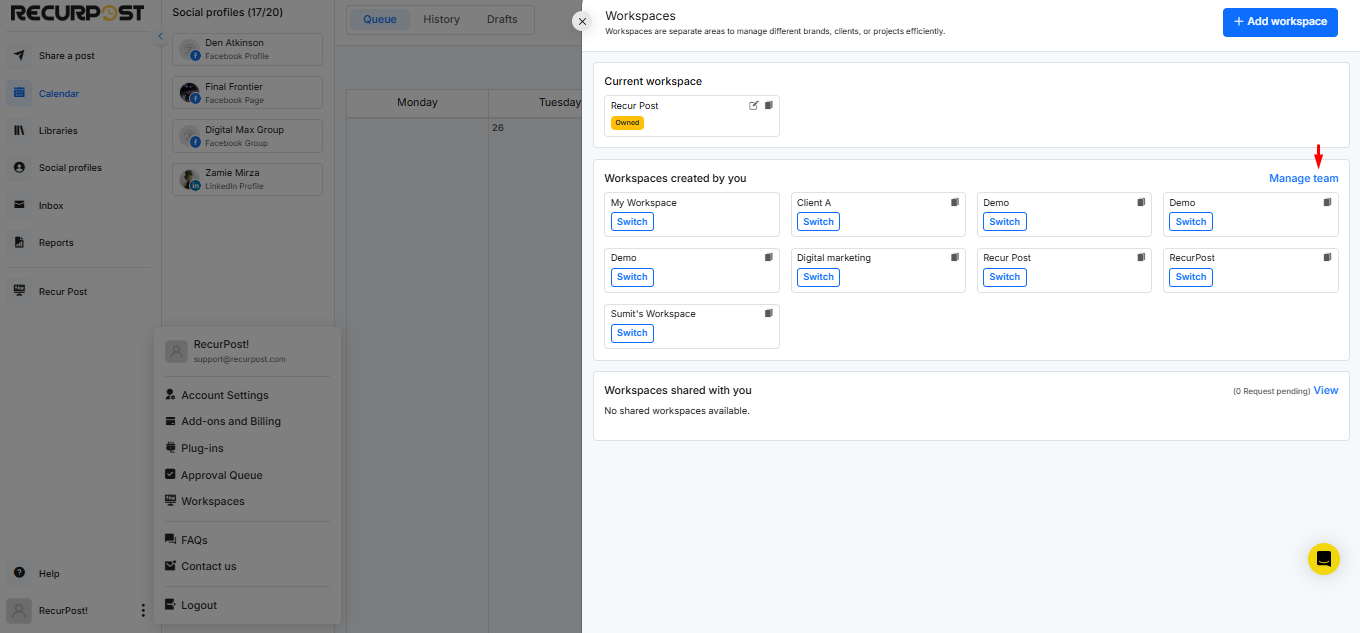
On the left-hand side of the dashboard, locate and click on the Profile Icon at the bottom to open the menu. Then, select Workspaces from the options provided.
In the top-right corner of the Workspaces window, click on the ‘+ Add Workspace’ button. A pop-up window will appear where you can enter a meaningful name for the workspace to ensure easy identification. Once you’ve entered the name, confirm your action, and the new workspace will be added under the “Workspaces created by you” section.
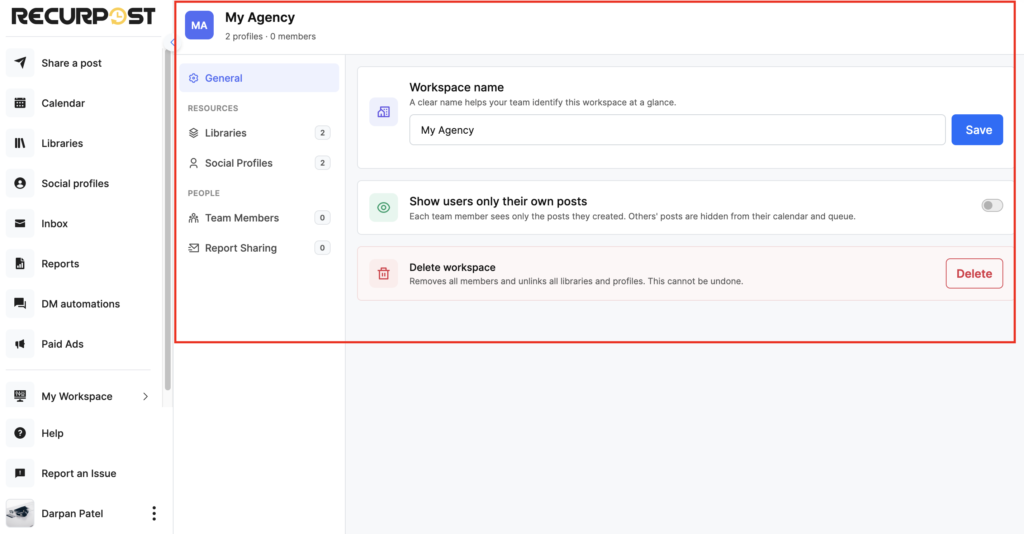
New UI: After creating your workspace, clicking into it opens the redesigned Edit Workspace screen. The left sidebar is now organized into three clear sections: General, Resources (Libraries and Social Profiles), and People (Team Members and Report Sharing). Everything for that workspace lives in one place.
Types of Workspace
- In the Default Workspace, you will be able to see all the social profiles and libraries you have in your RecurPost account.
- In the Shared Workspace, you will be able to see all the social profiles and libraries that are shared with you.
- In the Owned Workspace, you will be able to see all the social profiles and libraries that you have shared with a team member.

Viewing Workspace Information at a Glance
RecurPost now makes it easier for managers to see what’s inside each workspace before they even open it. This saves time and helps you stay organized.
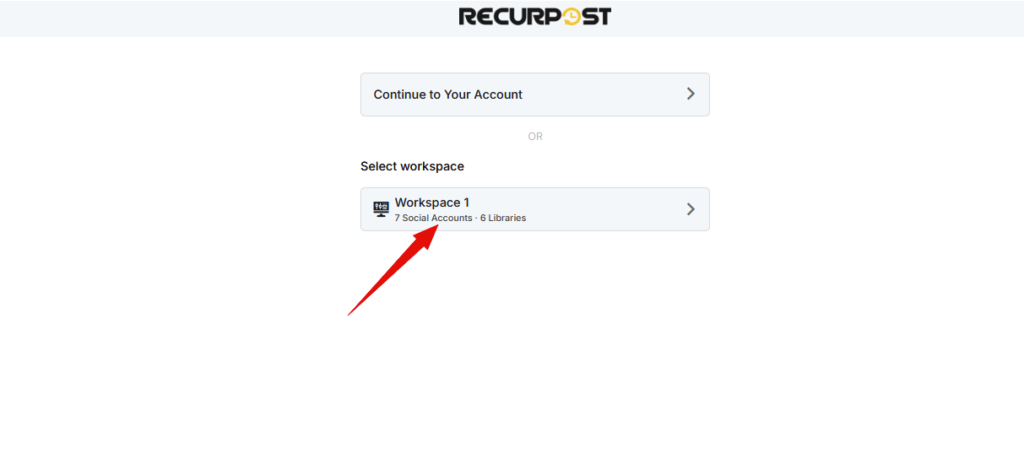
When you log into your account, you’ll notice something new. Each workspace now displays two important details right on the main screen.
- First, you’ll see the total number of social profiles assigned to that workspace.
- Second, you’ll spot how many libraries are available in it.
This quick overview helps you understand what you’re working with. No more clicking into each workspace just to check what’s there.
For example, if you see “Workspace 1 – 7 Social Profiles – 6 Libraries,” you know exactly what to expect. You can decide which workspace needs your attention first.
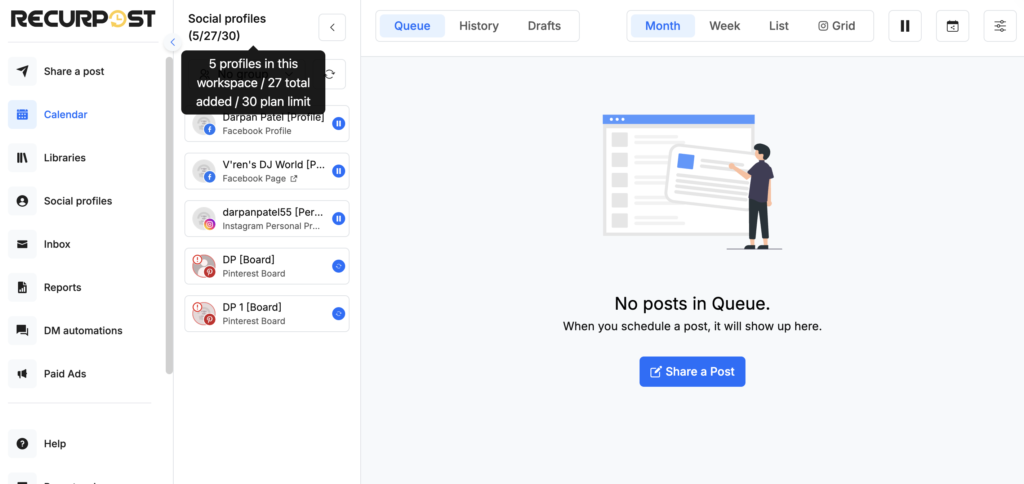
Once you enter any workspace, the dashboard continues to show you this information. The assigned social profiles count stays visible, keeping you informed at all times.
This feature is especially helpful when you manage multiple clients. You can quickly identify which workspace belongs to which client based on the number of accounts and libraries.
2. Providing Access to Social Profiles and Libraries
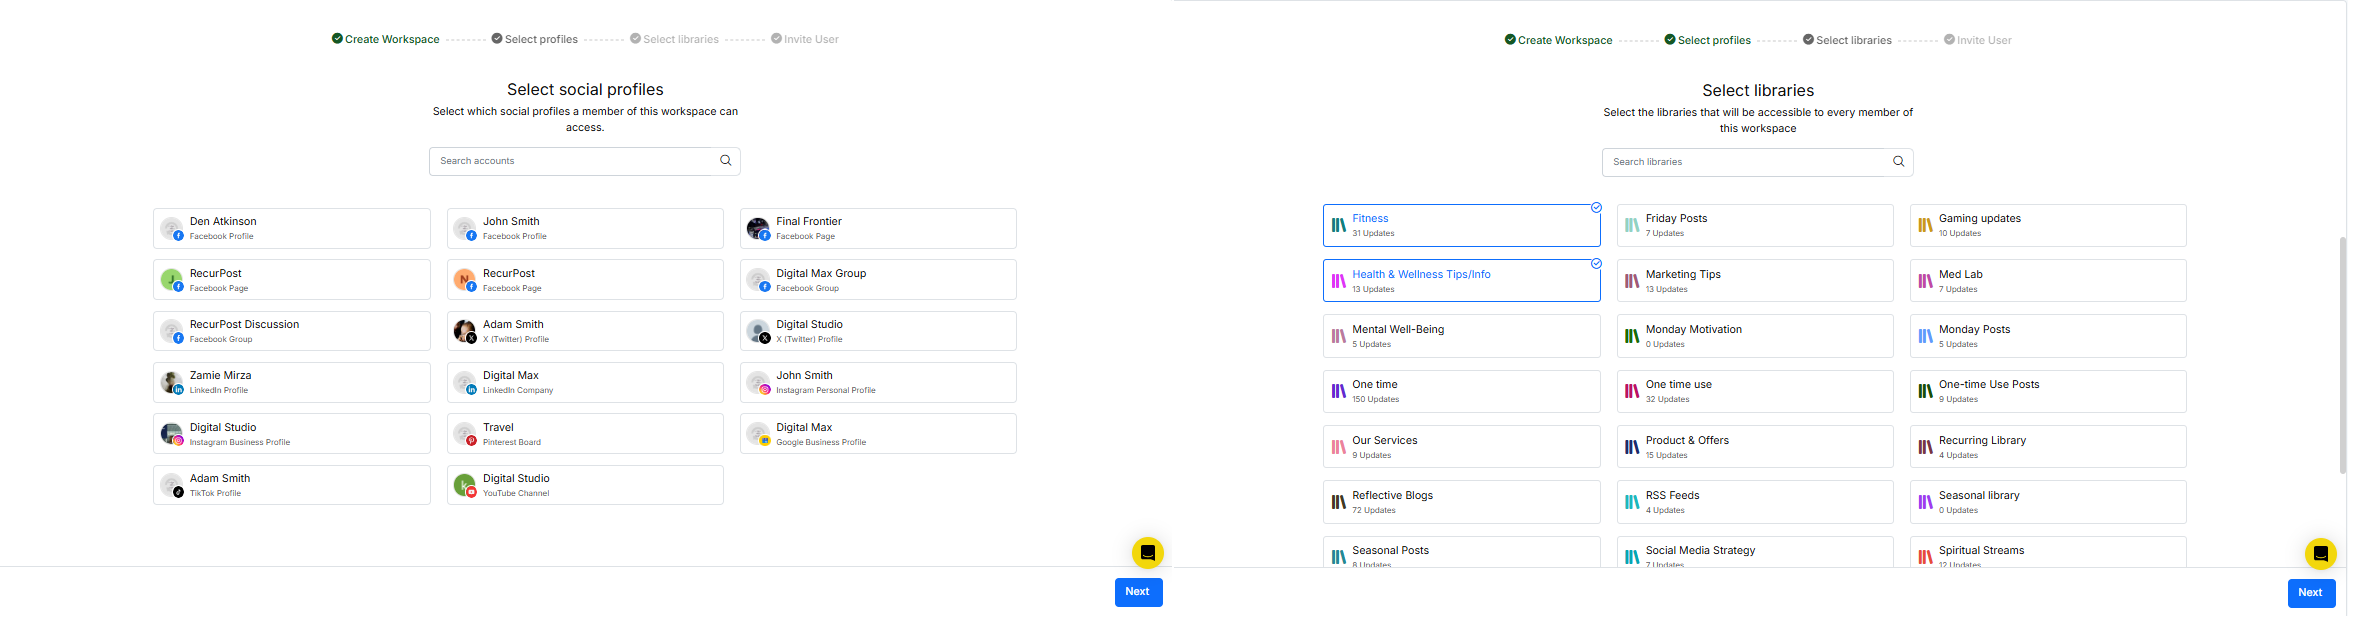
Once you have created your workspace, you will have to grant access to the social profiles and libraries that you want your team members to manage for that workspace.
Here, you need to select the libraries and social profiles that will be added to this workspace. After granting permission, the team member can post and manage the social profiles and libraries in that workspace.
3. Adding a Team Member to your Workspace
With our Workspace feature, you can effortlessly invite team members and assign them libraries and social profiles that you want them to manage.
You can add a team member to manage your workspace as per the plan that you are on. And if you want to add more to what you get on your plan, you can opt for add-ons.
Please note that you can only invite those who already have a RecurPost account. If they don’t already have an account, they will need to create one.
Additionally, to manage a RecurPost account, the team member does not need to sign up for a paid plan; they can use a free account until they are managing the RecurPost account as a team member.
Let us check how to invite team members in RecurPost.
Inviting a Team Member via Email
To invite a team member, you can go to your Workspace tab and click on ‘+ Add Workspace‘ if you have not created one already.
Then enter their email address and hit ‘INVITE’. Once you do, they will get an email invitation request, which they must accept.
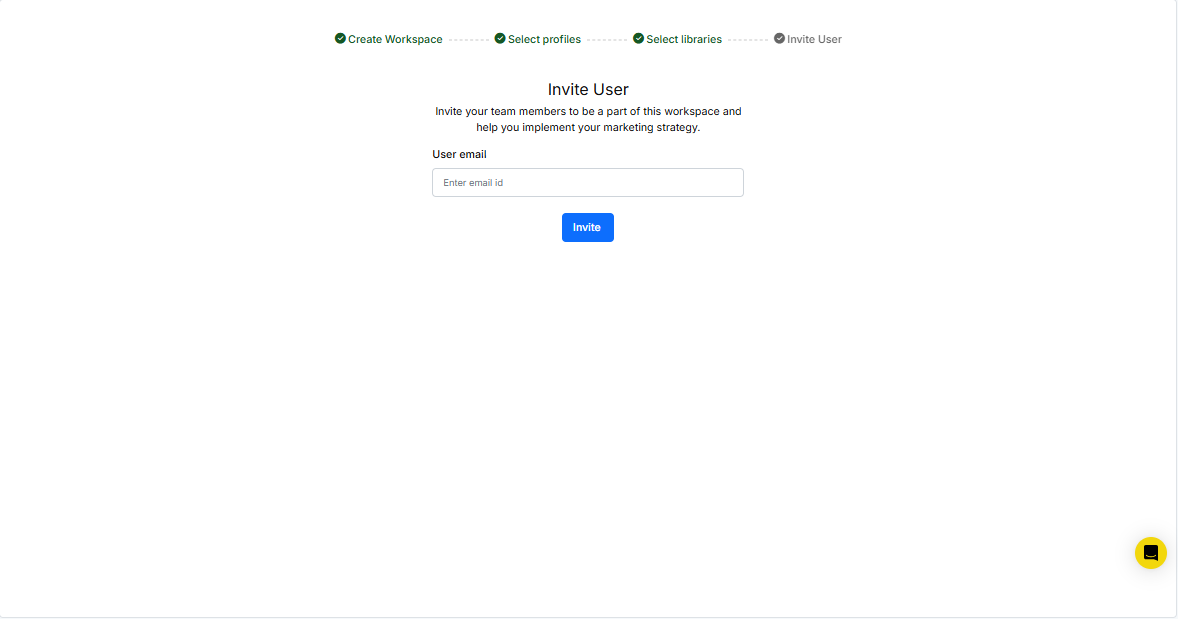
Once they have accepted the invitation, they can switch to the shared workspace and start posting and managing from there.
4. Editing the Workspace
In the edit workspace option, you can edit the workspace that you have created, which you own.
The Edit Workspace screen has been redesigned with a cleaner, more structured layout. Here’s what you can do from each section:
General
- Workspace name: Update the name and click Save to apply the change.
- Show users only their own posts: Toggle this on to hide other team members’ posts from the Calendar and Queue. Each member will only see content they personally created.
- Delete workspace: Click the red Delete button to permanently remove the workspace. This unlinks all libraries and profiles and removes all members. This action cannot be undone.
Resources
- Click Libraries to view and manage the libraries assigned to this workspace.
- Click Social Profiles to add or remove social profiles for this workspace.
People
- Click Team Members to invite new members or remove existing ones.
- Click Report Sharing to manage who receives workspace reports.
The new layout means you no longer have to hunt through menus. Every workspace setting is one click away from the left sidebar.
5. Clone/Duplicate a Workspace
You can clone your workspace using this option. You can create a duplicate of the workspace that you own.
When you clone a workspace, it creates a new workspace with access to all of the social profiles and libraries that were in the workspace whose clone you created. Please note that after cloning the workspace, you will need to invite the team member again.
After cloning a workspace, open the new workspace and use the redesigned Edit Workspace screen to quickly update the name, assign profiles, and re-invite team members, all from the same screen.
6. Managing team
To view all the invited members and the Workspaces shared with you, click on the ‘Manage Team’ button.
Under this section, you will find a list of members you have invited to collaborate and manage your Workspaces.

In order to remove any member or leave any workspace assigned to you, simply click on the ‘Remove’ button.
Sending a Post for Approval
If required, a team member who manages a RecurPost account can send the post for approval before adding it to a library for review.
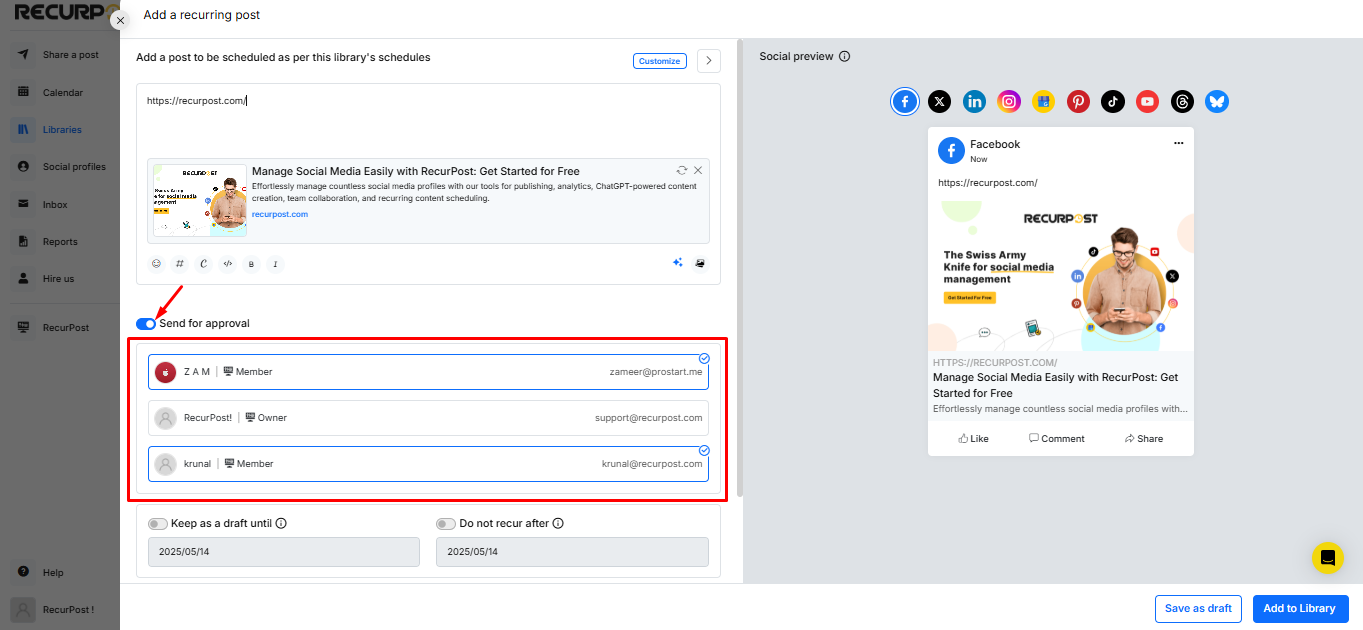
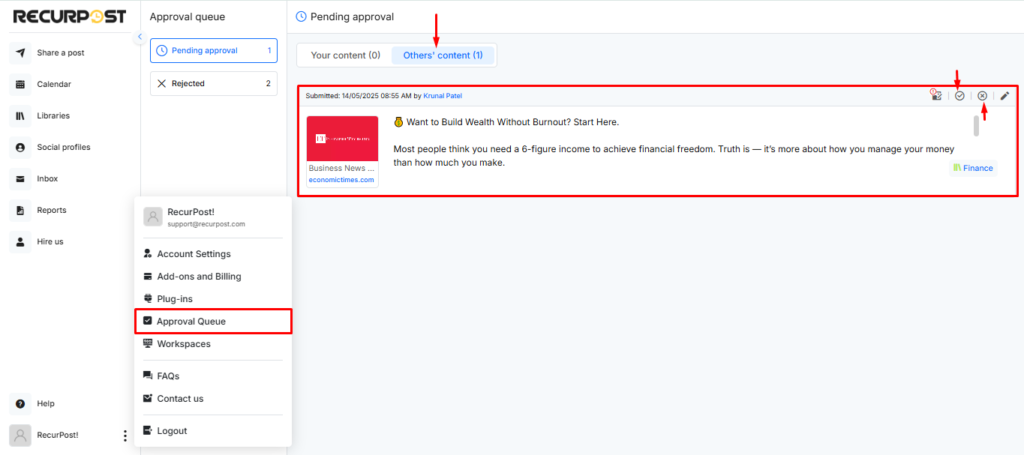
Once a post is sent for approval by any team member within a RecurPost workspace, it will appear in the Approval Queue. The workspace owner, along with any team members who are selected to receive the post for approval by the sender, can review and approve the posts. Once approved, the posts will be added to the designated library.
With the latest update, RecurPost also sends automatic email notifications whenever a post is sent for approval, approved, or rejected. This keeps approvers, workspace owners, and contributors updated on status changes and speeds up the review cycle without needing to manually check the Approval Queue.
Important Notes for Inviting Team Members
- The person that you are inviting needs to have a RecurPost account. They can simply register for an account and sign up for the free trial in order to manage their workspace. After the free trial, they will not have to upgrade to any plan to continue using it, as they can stay on the free account.
- You can invite members according to the plan you have purchased. For example, if you are on the ‘Agency’ plan, you can invite 2 members. If you wish to add additional members, you can do so at an additional cost of $20/month per member
- When any member adds content to the libraries, sets schedules, or makes any changes to the assigned workspace, it will be reflected on everyone’s accounts who are managing that workspace.
Here is a video showing you how it works:
Workspace Watermark
RecurPost lets you set a watermark at the workspace level. Upload your logo once, and it gets stamped on every image posted from all social profiles in that workspace.
You don’t need to set it up separately for each account. One watermark covers the whole workspace automatically.
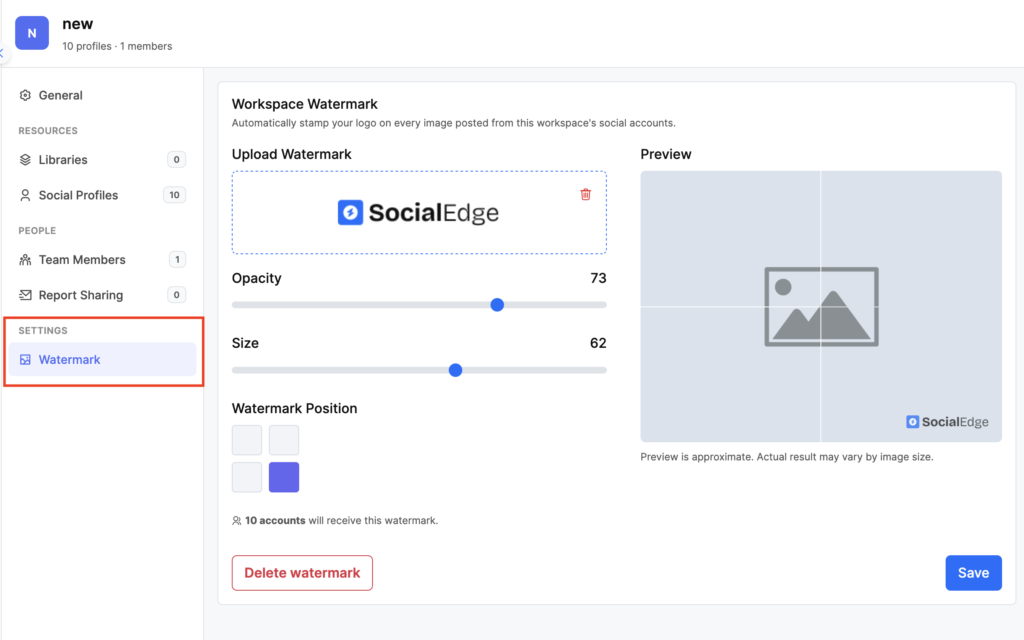
How to set up a workspace watermark
- Open Workspace Settings for the workspace you want
- Click Watermark in the left sidebar
- Click Upload watermark image (JPG or PNG, max 2 MB)
- Adjust Opacity using the slider – lower for lighter, higher for bolder
- Adjust the size using the slider to fit your image posts
- Pick a Watermark Position – top-left, top-right, bottom-left, or bottom-right
- Click Save
RecurPost then applies this watermark to every image posted from that workspace’s social profiles.
Tip: A PNG with a transparent background gives clean edges on any background image.
What happens to social profiles in the workspace
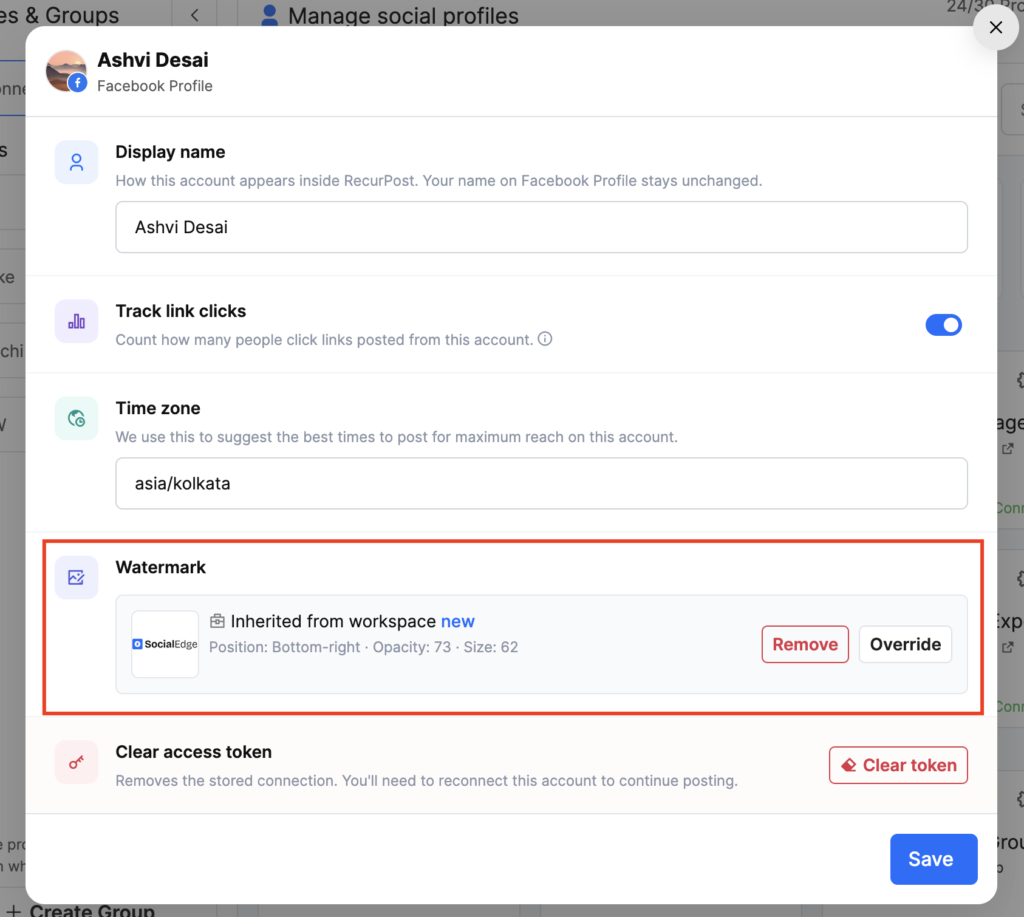
Every social profile in the workspace inherits the watermark automatically. No extra setup needed per account.
Each account will show “Inherited from workspace” in its own Watermark section. The opacity, size, and position all carry over from the workspace settings.
Account-level overrides
Individual accounts still have full flexibility. From the social profile’s settings, a user can:
- Override: replace the workspace watermark with a different one just for that account
- Remove: turn off the watermark for that account only
The workspace watermark stays unchanged for all other accounts.
Delete the workspace watermark
To remove the watermark from the entire workspace, scroll to the bottom of the Workspace Watermark settings page and click Delete watermark. All accounts that were inheriting it will stop receiving it.
That’s it! Please email us at support@recurpost.com if you have any queries.